Recently, I decided to document the steps taken following a new Membership confirmation here at ArmfieldTech. Here is our step-by-step Complete guide to Set-up a new WordPress site with Cloudflare CDN and DDoS Mitigation on a Digital Ocean Droplet (VPS).
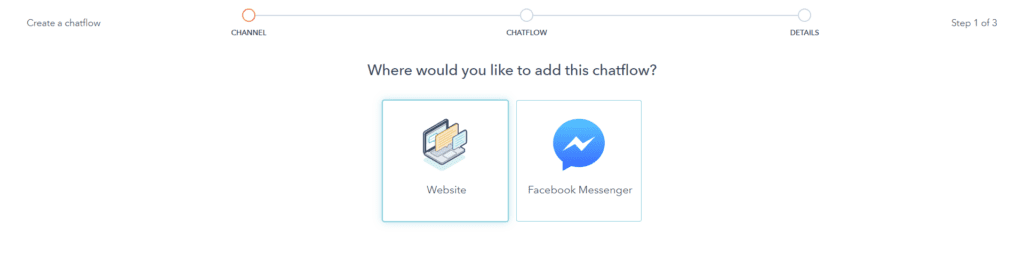
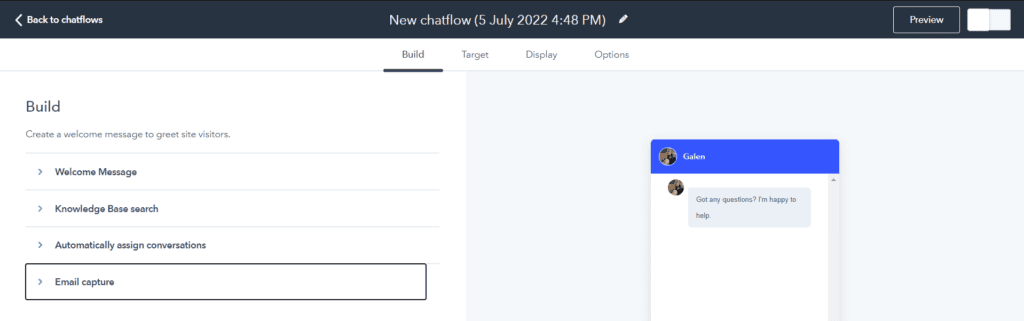
Plus we will also be walking you through the Hubspot integration and setting up a simple live chat popup on your site to use as your first contact funnel. HubSpot is free to use for what we will be doing but there are also paid options with HubSpot which will unlock additional features and support.
Let’s get into it, shall we?
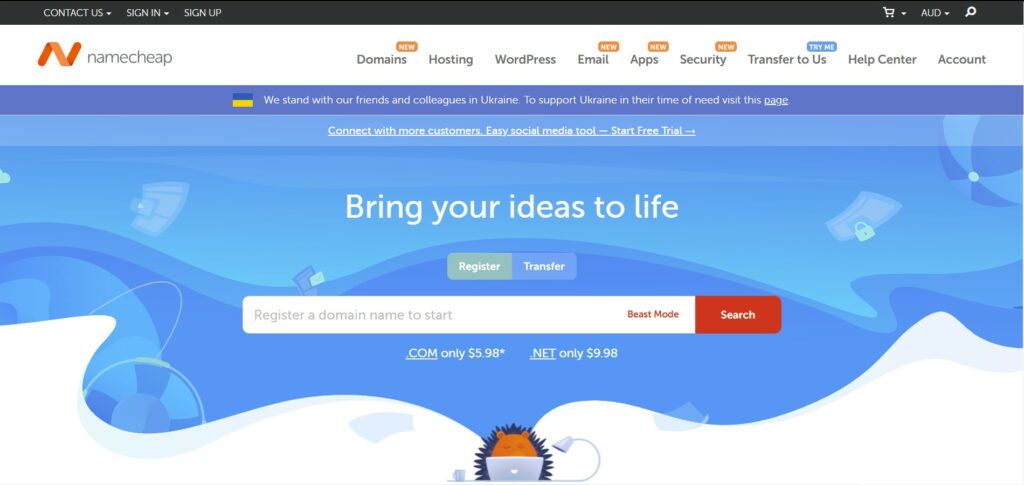
First, we register the domain name with namecheap.com
Getting the domain name and DNS settings connected correctly is our first priority. We have found Namecheap to offer great value introductory offers along with keeping their retain prices down. Namecheap also offers domain privacy for free, always! We are always on the lookout for better deals so if you know any better, we’d love to hear from you!
While we are here, we’ll go through a quick email forwarding walkthrough. This will allow us to receive emails from up to 100 forwarding addresses with our new domain right away!
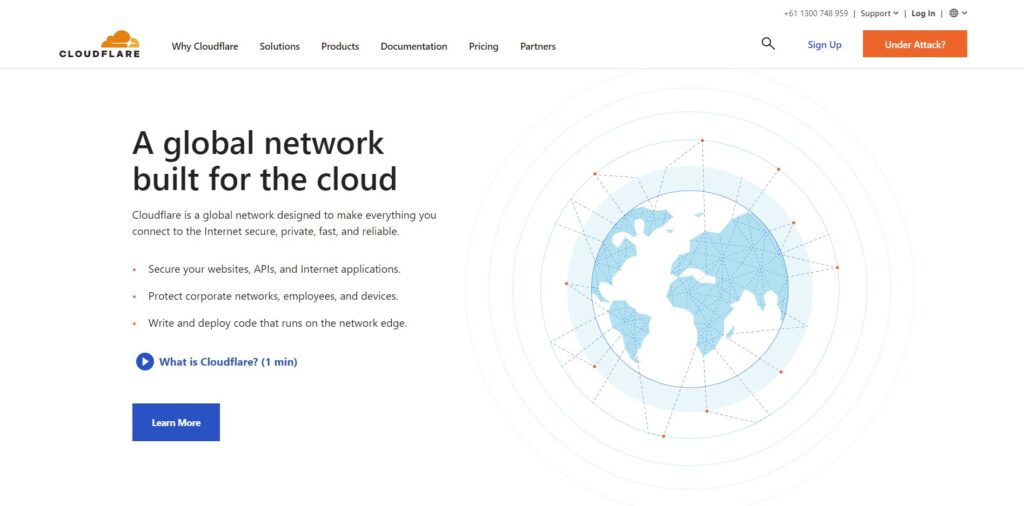
Next, we are going to set up our Free Cloudflare.com account
Cloudflare’s services are best described by Cloudflare if you ask me. The reason I use their services is that I know they will do what I would waste resources learning. I believe outsourcing and third-party apps are what connect the internet and the connected businesses.
If you already have a Cloudflare account, simply sign in to your account here and go to the next step. To sign up to Cloudflare for free go to https://dash.cloudflare.com/sign-up enter your email and create a password. You will be sent an email to verify your account, ensure you click the link and verify your account before continuing.
Go to the Cloudflare dashboard then click ‘Add Site’
We now need to add our site to Cloudflare. Go to the Cloudflare dashboard using the link above, click the first ‘Add Site’ button and enter your site URL, then click the next ‘Add Site’ button.
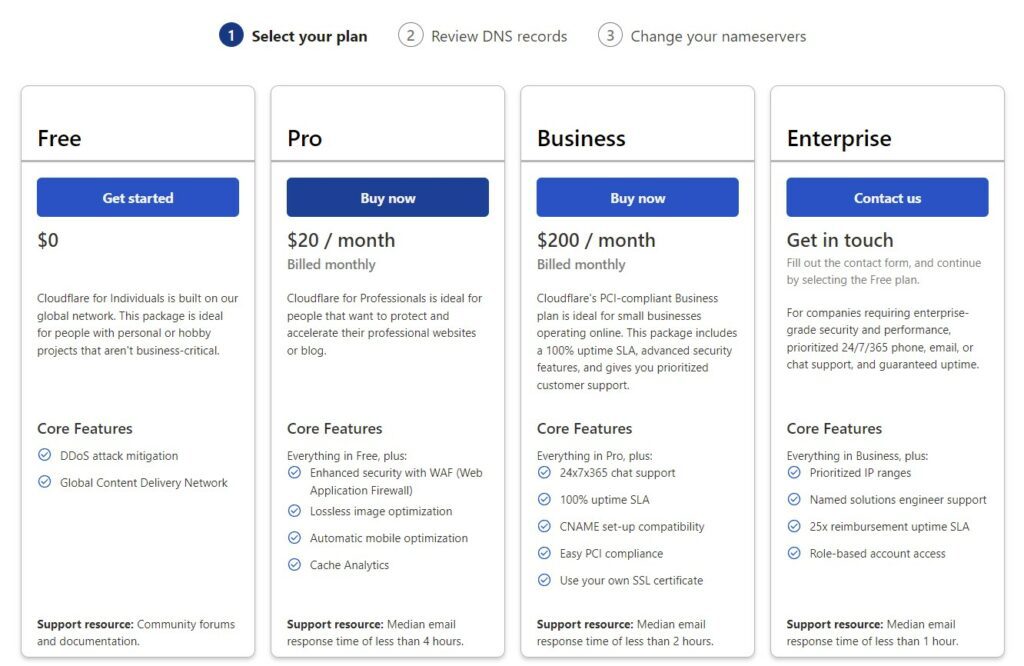
Select your Cloudflare Plan
Cloudflare is free to use for Distributed Denial of Service (DDOS) attack mitigation and Global Content Delivery Network (CDN). The Pro, Business and Enterprise plans offer great features and the Pro plan is good value in my opinion. For the time being though, I continue to use the free service for the amazing features it has and continue to use other apps to improve image optimisation for example.
Verify your domain DNS records
The next step is to verify your domain records, at this stage, we have no records to add. The Droplet is yet to be created so we don’t have an IP address for the ‘A’ record. Mail server-related records will be added in the PostMarkApp section below.

With Namecheap.com you may see two records that have a ‘Delete’ option. We tend to delete these records as they are just defaulted by Namecheap.com.

Scroll down the page a tad to click the ‘Continue’ button.
How to change your namecheap.com nameservers (NS) to Cloudflare.com nameservers
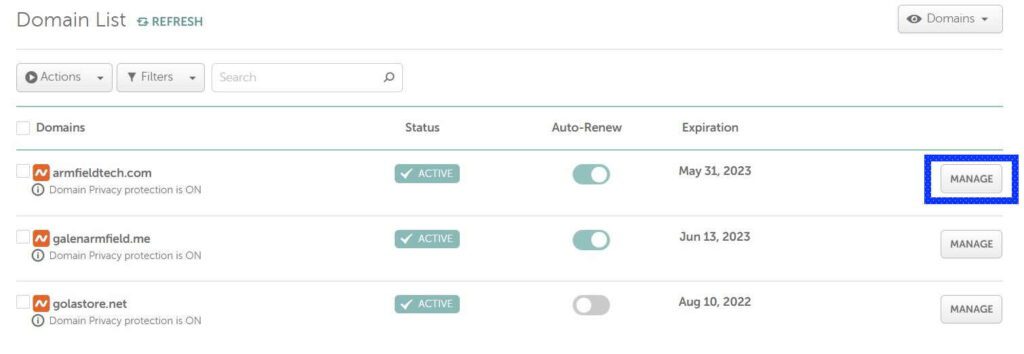
Now we need to copy the nameservers provided by Cloudflare. Then add them to our domain DNS records over at https://ap.www.namecheap.com/domains/list/. Find the domain in the list and click ‘Manage’.
We are now in the domain control panel. Scroll down to the ‘NAMESERVERS’ row, click the dropdown list and select ‘Custom DNS’. Now, two fields will appear allowing you to paste the two nameserver URLs from Cloudflare. Once you have reviewed the records and ensured they are correct, click the green tick on the right-hand side.
It can take up to 24-48 hours for nameservers to properly update. New or less used domains can update faster from our experience, this is just an observation. You will receive an email when your site is active on Cloudflare.
Note: If you have lost the page you can start the process again by clicking ‘Add Site’ when logged in to Cloudflare.com.
Finally, go back to the Cloudflare page and click the ‘Done, check nameservers’ button. If noting the above information, we should give approx 30 mins before checking nameservers. Although, sometimes I am ‘feelin lucky’ and only wait 5 mins, just enough time to make a coffee!
Follow the Cloudflare Quick Start Guide
We like to follow the Cloudflare Quick Start Guide as it helps us set the primary settings quickly. All in 3 simple steps (Security, Optimisation and Summary).
“Automatic HTTPS Rewrites will help to fix mixed content by changing “HTTP” to “HTTPS” for all resources or links on your website that can be served with HTTPS.” We suggest you keep this on.
“Always Use HTTPS, will redirect all requests with the scheme “HTTP” to “HTTPS”. This applies to all HTTP requests to the zone.” While you can make your own decision here, we prefer to turn it on unless it’s causing issues during the development stage.
“Auto Minify to reduce the file size of source code on your website. Note: Purge cache to have your change take effect immediately.” We select JS, CSS and HTML unless this conflicts with plugins or website.
“Brotli to speed up page load times for your visitor’s HTTPS traffic by applying Brotli compression.” Why not use the free compression software?
Once you have reviewed the summary, click ‘Finish’.
How to set up Email forwarding in Cloudflare
You can follow the Namecheap email forwarding article here if you are not following the Cloudflare option.
Cloudflare offers Email Routing (Beta) which you can use to direct incoming emails for your new domain to your Gmail. We won’t need this feature soon, as we will have a mail server set up.
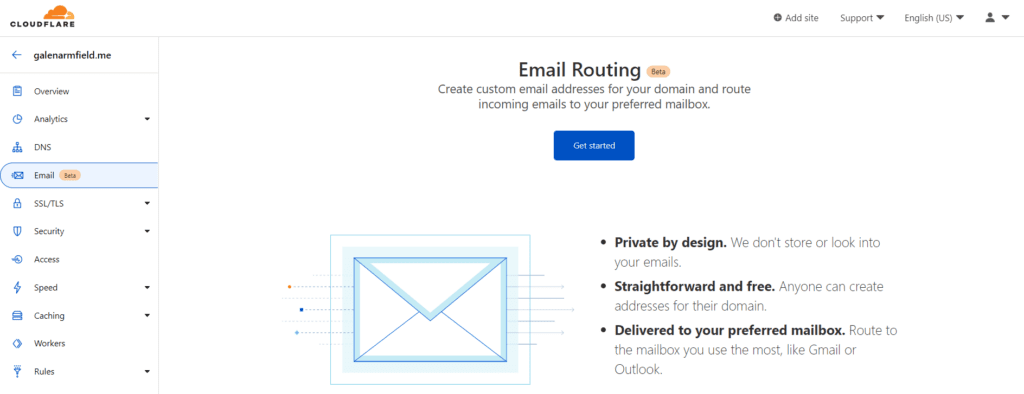
Go ahead and click ‘Get started’ and enter your customer address and the destination address. Then click ‘Create and continue’ to receive an email verification link.
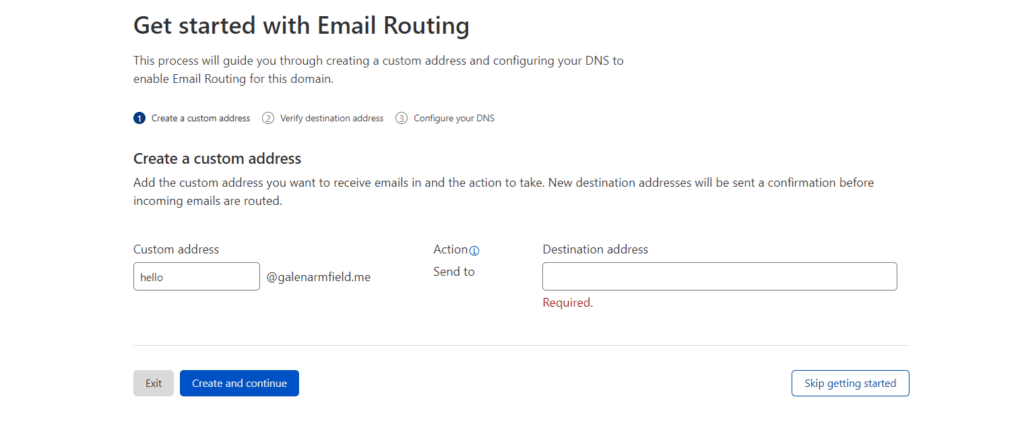
You will need to go to your Gmail or mailbox where you receive emails for the ‘destination address’. Find the email from Cloudflare and click ‘Verify email address.
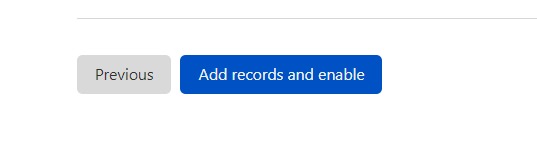
Now we need to delete the records conflicting with Cloudflare’s Email Routing. These will be from namecheap.com and will not affect our site. Simply click ‘delete’ for each record required and then click ‘Add records and enable’.
How to create a new Droplet with Digital Ocean running OpenLiteSpeed Cache & WordPress
Now we are going to set up our VPS with OpenLiteSpeed CP, WordPress and CertBot. We will use the Digital Ocean marketplace to install the package with WordPress, OpenLiteSpeed, CertBot and more! All running on a secure yet lightweight Ubuntu (Linux) server.
It might be a good time to mention if you are looking for windows servers or guides for windows servers… You’re unfortunately in the wrong place as I have no interest in windows server products. We are all things open source here at Armfield Tech, FREEDOM OF INFORMATION!
So if you haven’t already, click the button below to get $100 free hosting credit! Help support ArmfieldTech and take the next step in the guide. Wow, I almost feel excited… About hosting… Ah, moving on.

Once you have created your Digital Ocean account, set up your billing, verified your account and have a Project open… It is time to click the green ‘Create’ button and select ‘Droplets’ to Create cloud servers.
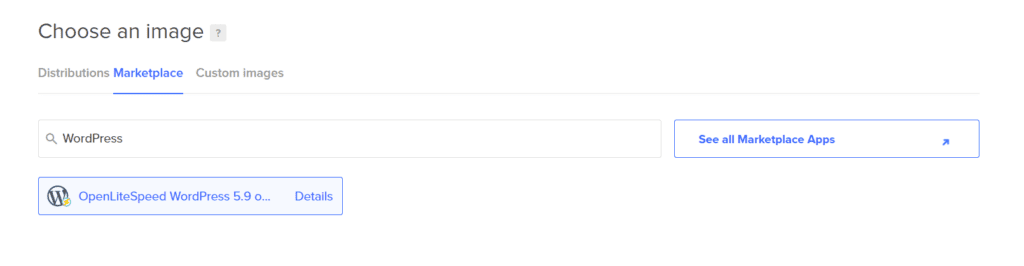
How to set up Digital Ocean Droplet with OpenLiteSpeed WordPress App
To select the ‘OpenLiteSpeed WordPress’ App, click on the ‘Marketplace’ tab and search for ‘WordPress’, select ‘OpenLiteSpeed WordPress‘ App.
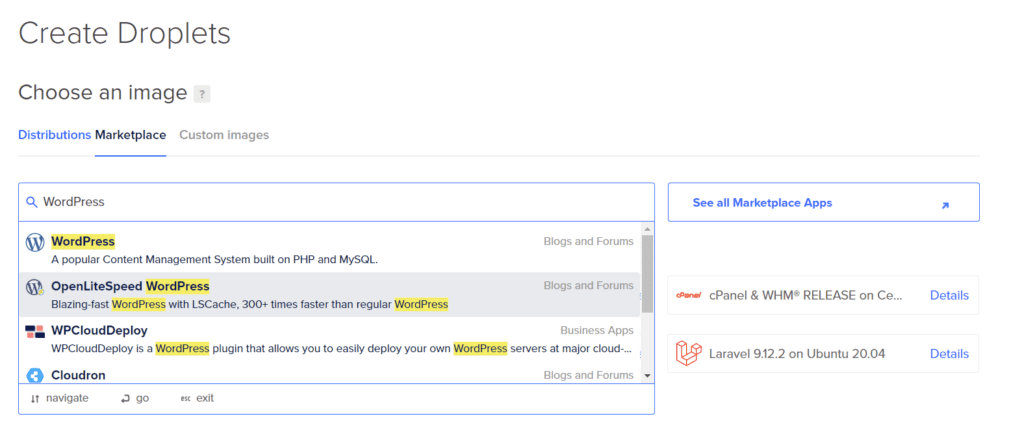
Once you have selected the ‘OpenLiteSpeed WordPress’ App, ensure that it is selected.
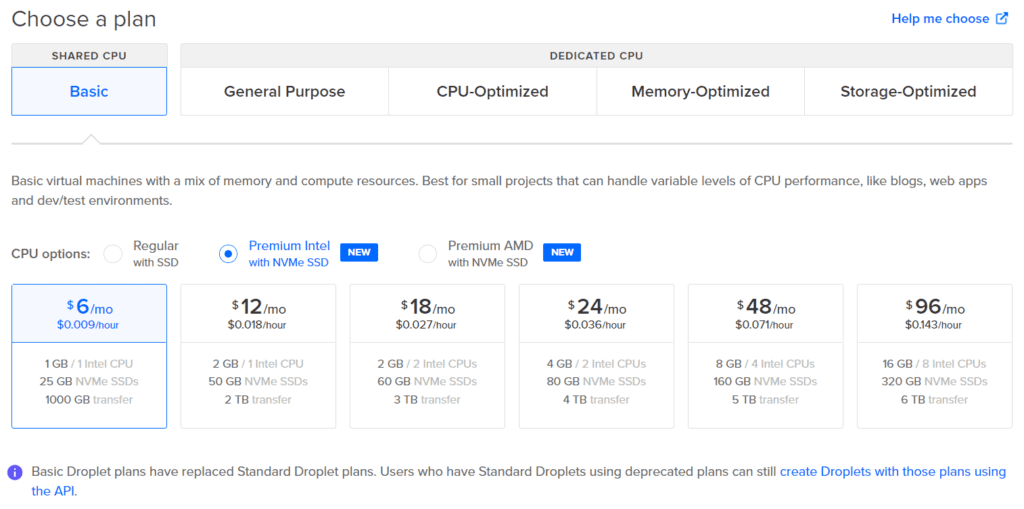
Choose your Droplet size/plan cost
Time to choose a plan. Select from ‘Premium Intel with NVMe SSD’ and choose your Droplet size. We suggest the $6 1GB RAM 1 CP 25GB plan for most WordPress websites. If you need more storage you can add storage blocks later. Also, you can simply upgrade your droplet without any downtime or interruptions.
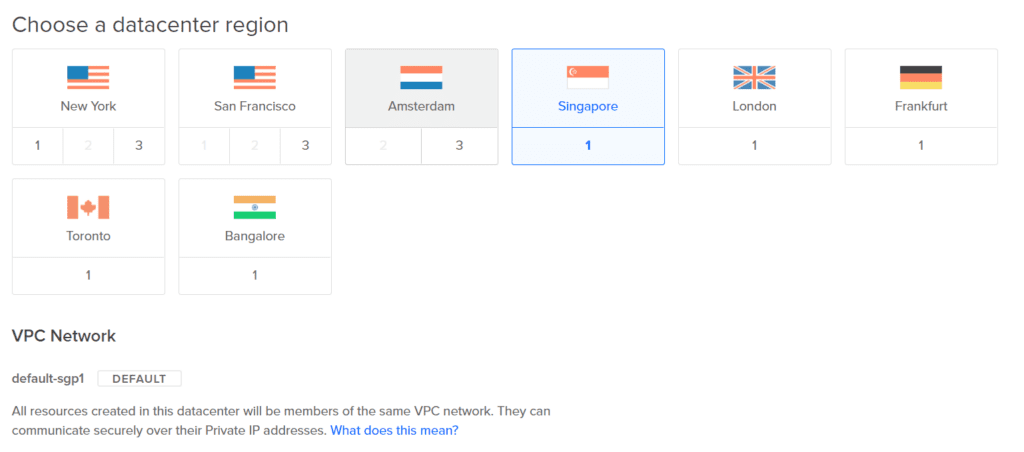
Select the Droplet region/Server location
Next, we will select the region we want our Droplet to be hosted in. We suggest a server region as close to your target demographic as possible. With Cloudflare, we get a Global Content Delivery Network and DDoS mitigation. Plus the option to add additional servers and Droplets around the globe with Digital Ocean.
So many features are available! It’s hard to fit them here so I will have to update this blog with more articles as we go.
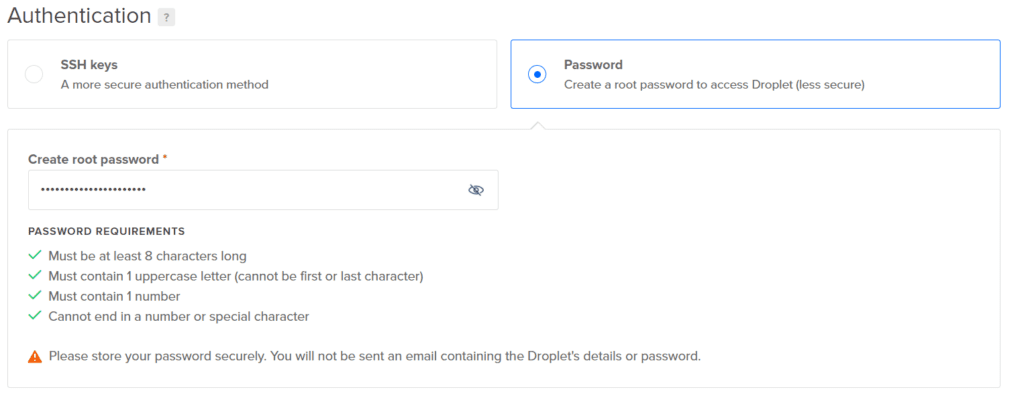
Choose a prefered authentication method & set the Root Password
After selecting the appropriate region we scroll down some more and select ‘Password’ in the Authentication section. After, set a strong password meeting the 4 requirements. This password will be used to access the console and configure the Droplet using the Ubuntu command line. Don’t worry we will walk you through that too and with pictures 🙂
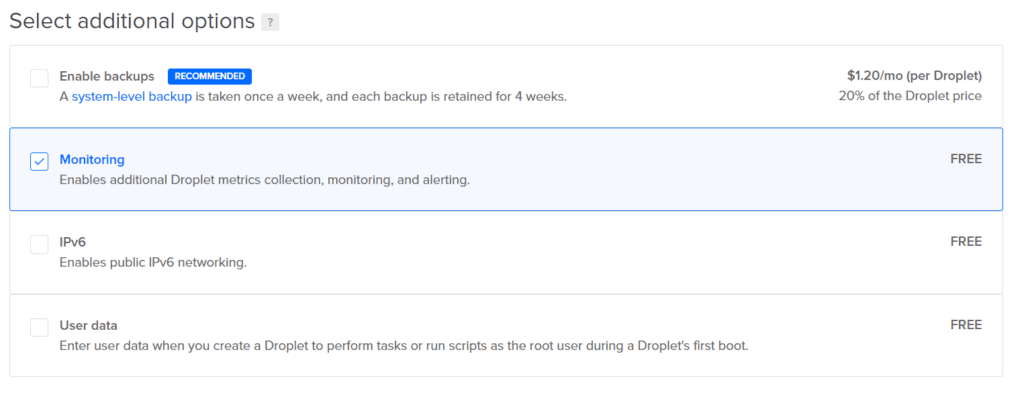
Select from additional options
Now, we can choose from a few additional options. We suggest ticking the ‘Monitoring’ option and leaving the rest. All-In-One WP Migration will be used to backup WordPress. Digital Ocean backups can be added later if we want to have volumes to restore. Personally, I prefer to have the WordPress backup and set up the Droplet from scratch.
This takes more time but you can be sure you have limited any server-level threats or corruptions. One of my previous ventures livelocalasia.com was hacked and I lost all my articles, unfortunately.
After the hack and corrupted backups from Updraft plus. I ditched the venture and focused on improving my IT skills.
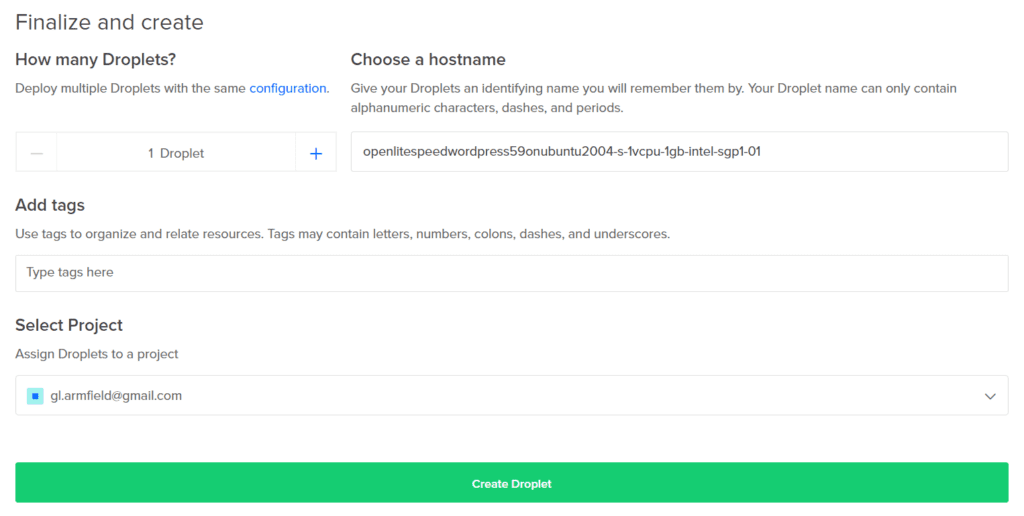
Set Droplet name/hostname, Assign Droplet to Project & Create Droplet
Finally, we choose a hostname, which is usually the domain of the website I am creating. This way we can keep our servers and websites organised and allow ease of access for members and for techs.
You can also add tags or further organise and relate your resources, along with assigning the Droplet to a Project. Projects are very helpful for managing multiple Droplets, Teams and Clients’ resources.
And once all your settings have been entered, it’s time to hit that BIG GREEN BUTTON! Create Droplet
How to change Droplet name/hostname in Digital Ocean
It shouldn’t take more than a few minutes for the droplet to be created. Now If you have forgotten to add a hostname or you want to change it, well I’ll tell you. Simply click on the droplet and then click on the hostname. A text field will appear allowing you to change the hostname and save it with the blue tick.
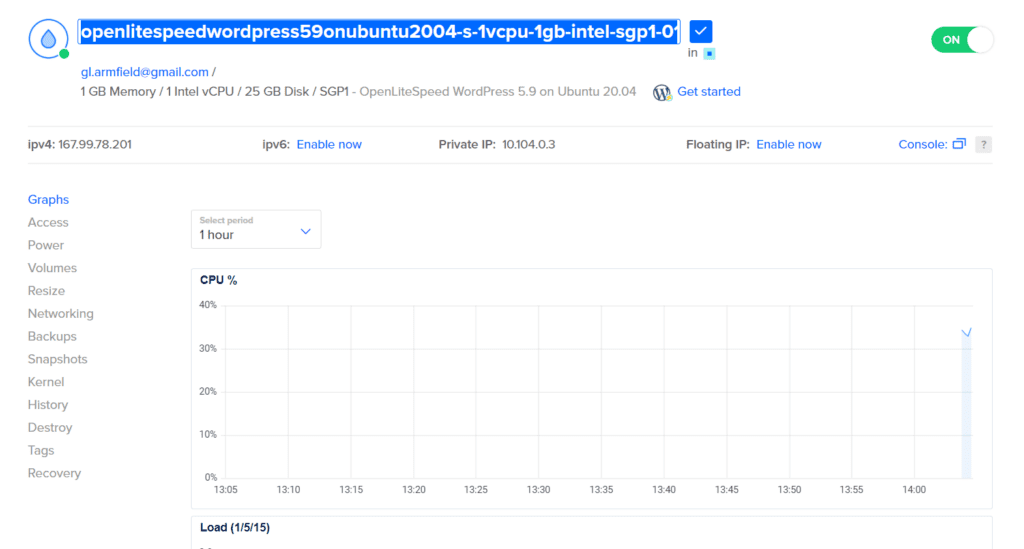
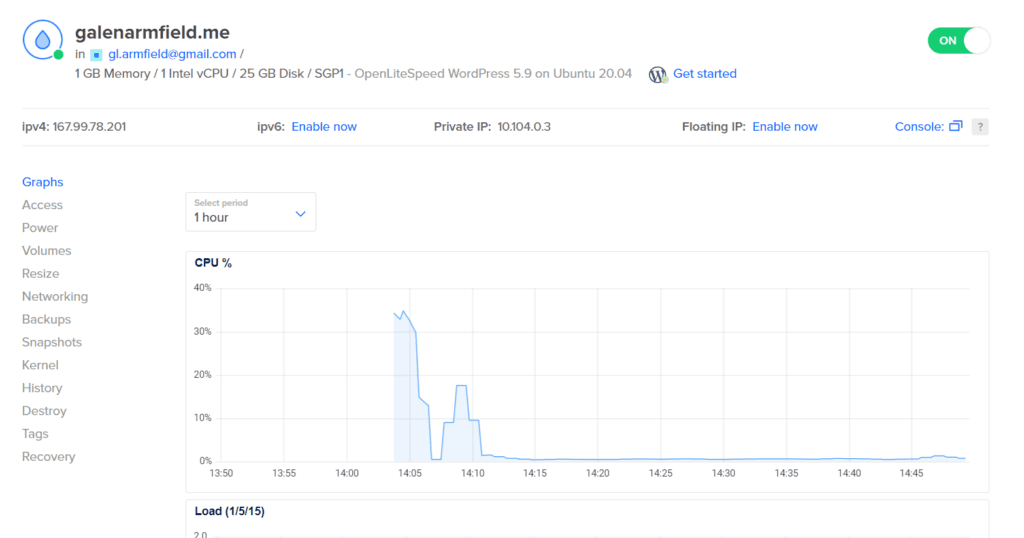
You will be able to monitor the CPU usage, Droplet load, Memory Usage, Disk Usage and Bandwidth usage. This will come in handy when you start to scale your operation. Or if your site starts to attract increased traffic, you can monitor your usage here and update your droplet accordingly. It’s recommended to keep a generous buffer to avoid downtime due to how to create your site and how much of an awesome job you did.
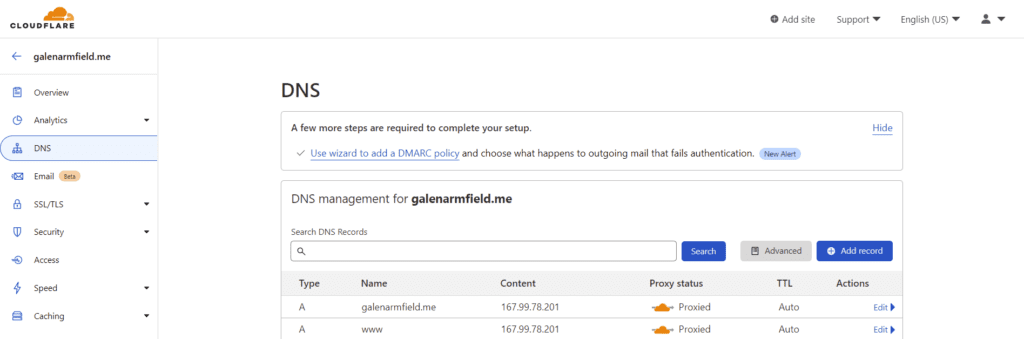
How to add ‘A’ Records and connect a domain to Digital Ocean droplet/Server
Before we jump into the console, we need to add two A records to our domain’s DNS records using Cloudflare. I also update the nameservers in Digital ocean to the Cloudflare nameservers just in case they cause some kind of conflict.
First, we copy the server/droplet IP address from Digital Ocean and paste it into the ‘Content’ Field. Use ‘@’ for the ‘name/host’ field for your first record and www for your second. The Content is always your IP address in this case.
Basically, we are saying to direct traffic for the domain to be directed to the server/droplet IP (server/droplet address), we want a record for the domain and one to include www URLs.
You will not need to change any of the Proxy status or TTL settings, leave these as default.
How to update Digital Ocean nameservers in networking
Go to Digital ocean and scroll down on the left manage section (navy blue section) and click ‘Networking’.
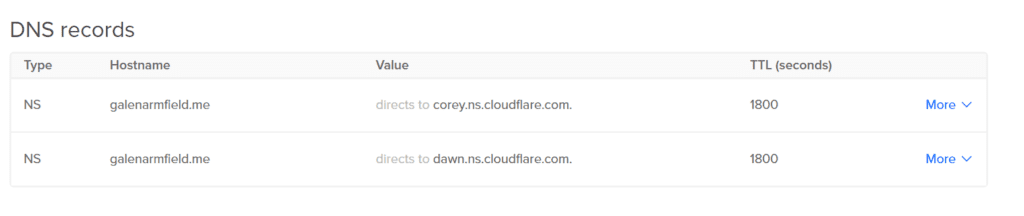
How to edit Digital Ocean Name Servers to Cloudflare nameservers
Click on the ‘Domains’ tab and click on your domain. Scroll down to show your DNS records with Digital Ocean. We edit the nameservers from the digital ocean records to the records shown in Cloudflare. This does seem to help certbot but theoretically, it should not make a difference.
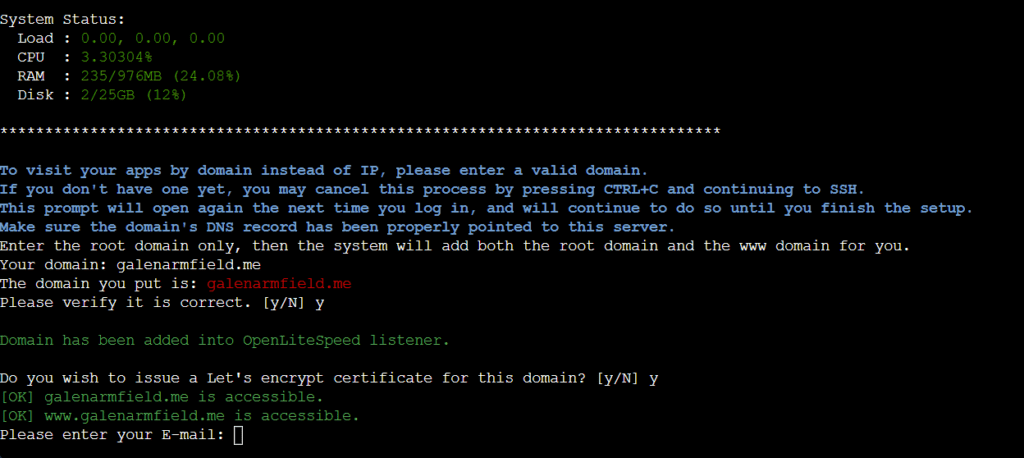
How to install Let’s Encrypt SSL in the Ubuntu Console on Digital Ocean Droplet
We now head back over to the droplet and click ‘Console’ to access the ubuntu console. To open your droplet console, click on the droplet and then click on ‘Console’ on the top right-hand corner near the green power switch.
The console will automatically log you in as root (admin). You will be promptly requested to enter your domain and set up the server. Ensure you enter these details incorrectly as it is not so easy to restart the setup. For example galenarmfield.me.
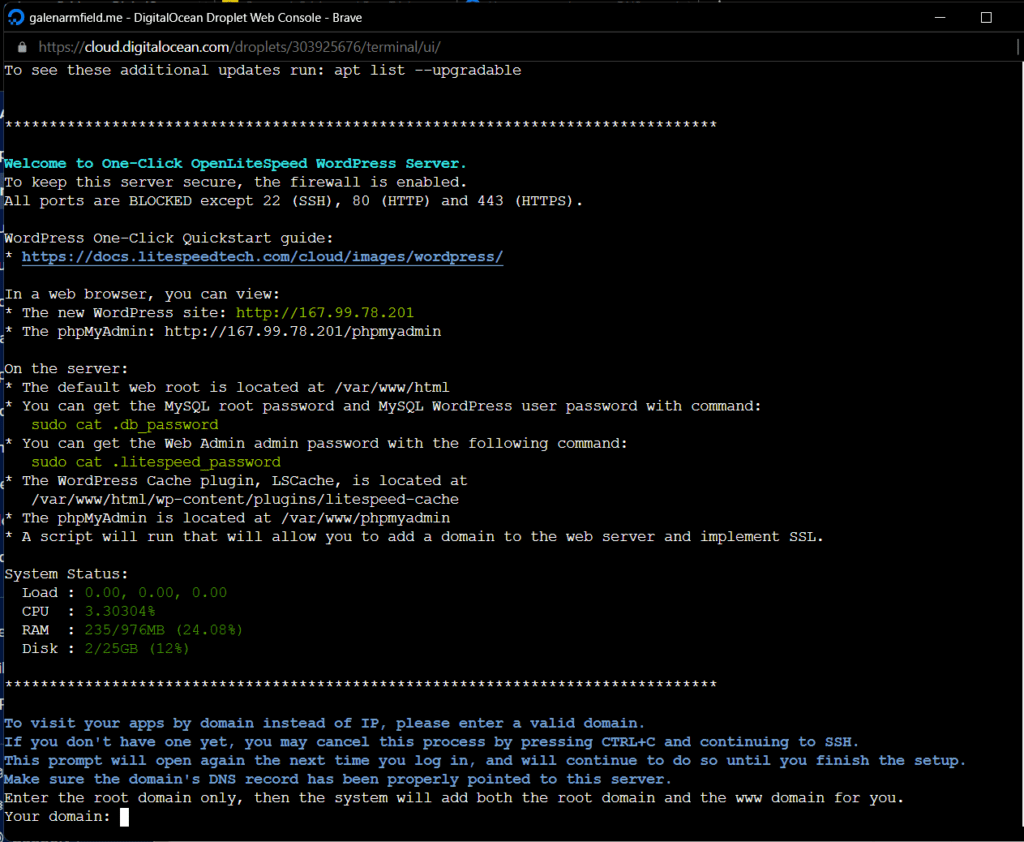
Once you have entered your domain press enter to submit your entry. You will need to verify by pressing y and enter.
When asked to issue a Let’s Encrypt certificate press y and enter.
After certbot does its thing obtaining an SSL cert, you will need to type y to the ‘Do you wish to force HTTPS to rewrite rules for this domain?” type y and press enter.
After that, you will be asked to update the system which of course we do! So type y and press enter.
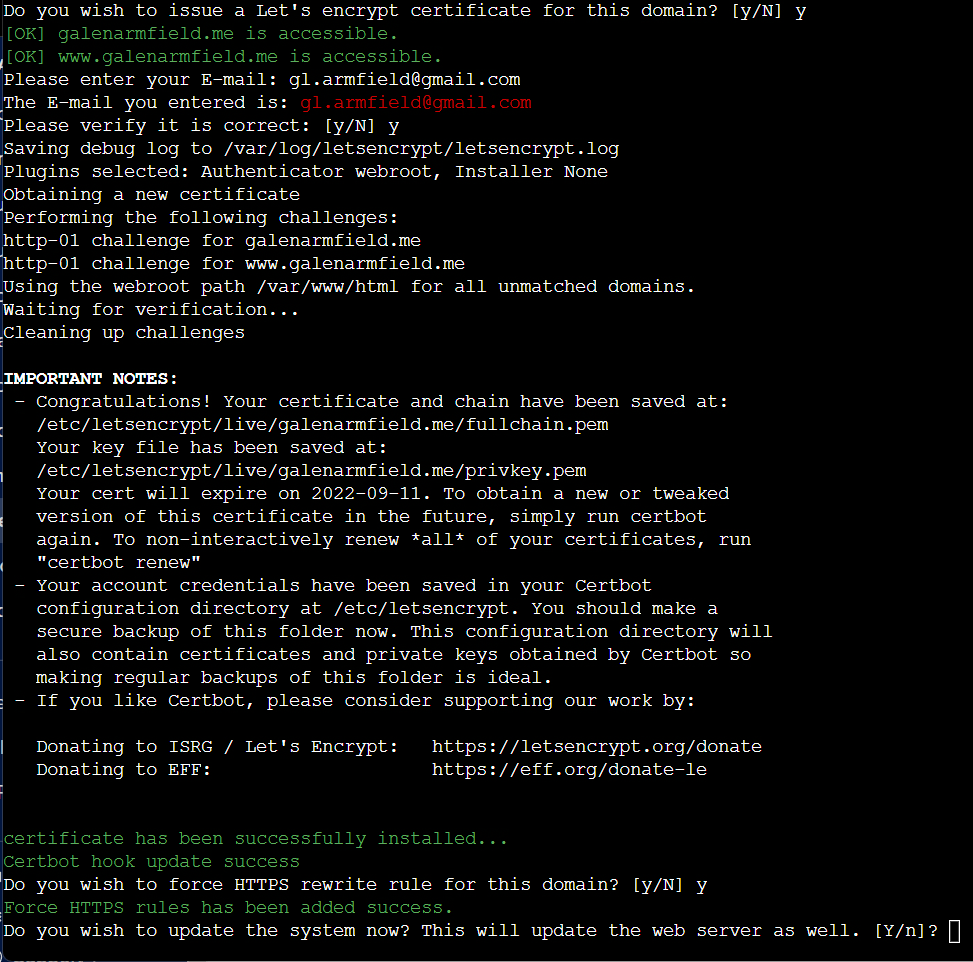
Wow, that was a lot of command line. My fingers hurt I might need a coffee break while the server updates and then I’ll get onto finishing up some Cloudflare settings and then set up WordPress.
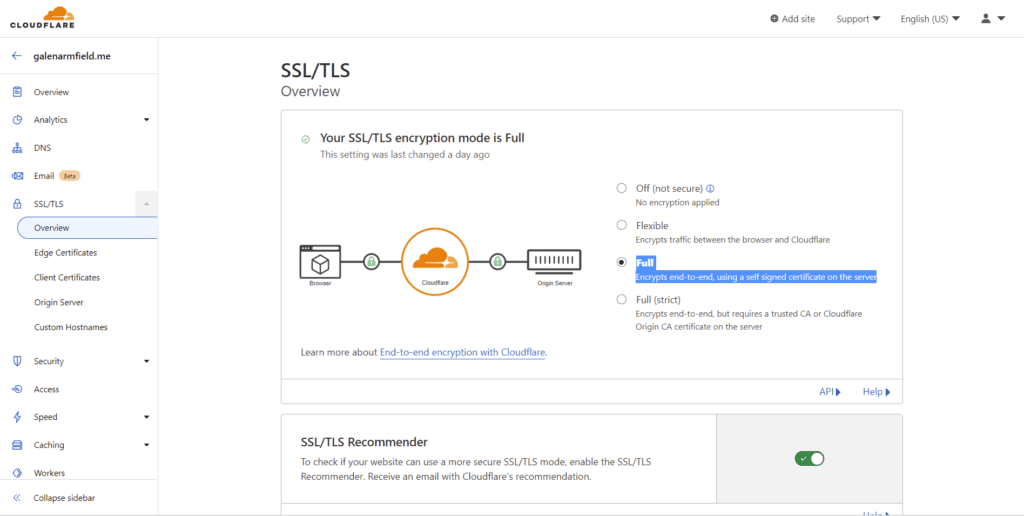
How to update Cloudflare SSL/TLS settings to Full
We want to change the Cloudflare SSL encryption settings to be: Full – Encrypts end-to-end, using a self-signed certificate on the server. I also suggest turning on the SSL recommender so Cloudflare will recommend the best setting for your site.
How to set up WordPress
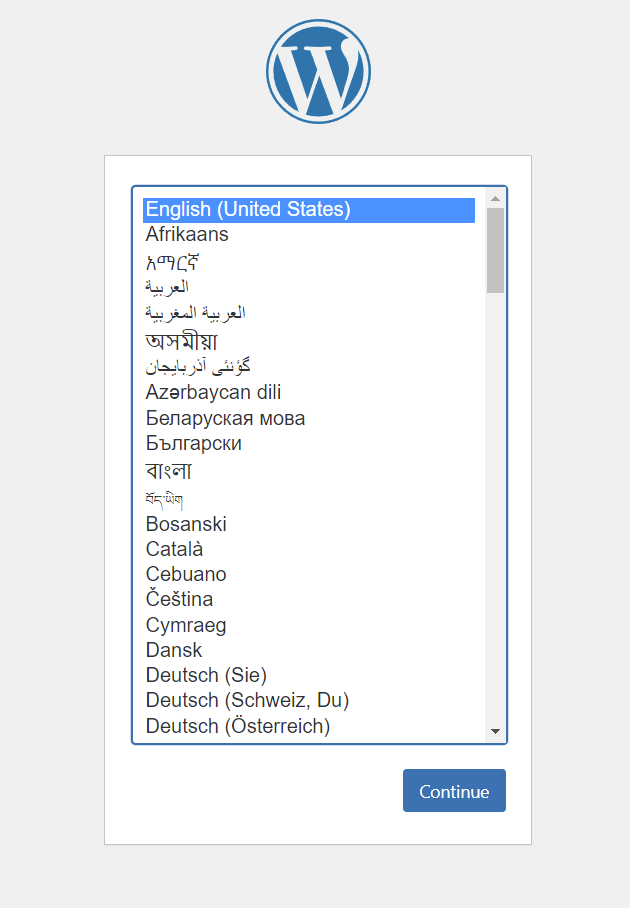
After running the ‘poweroff’ command or restart command in the Ubuntu console, we visit our domain in our prefered browser. We use Brave which is the same as Google Chrome. This will bring us to the WordPress setup page.
Here we select our prefered language and Continue.
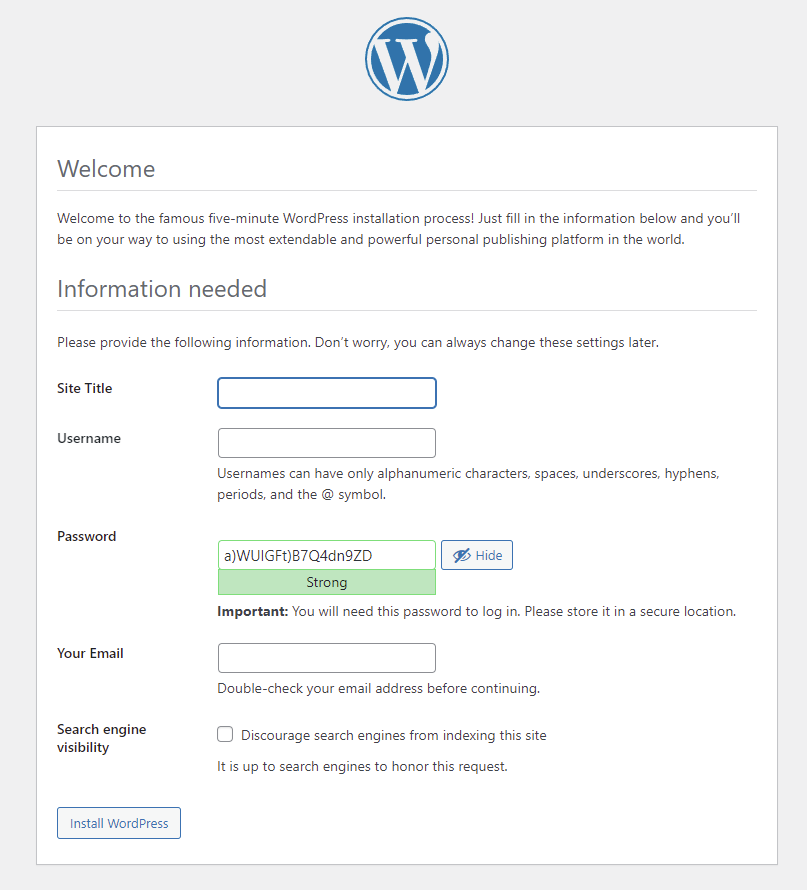
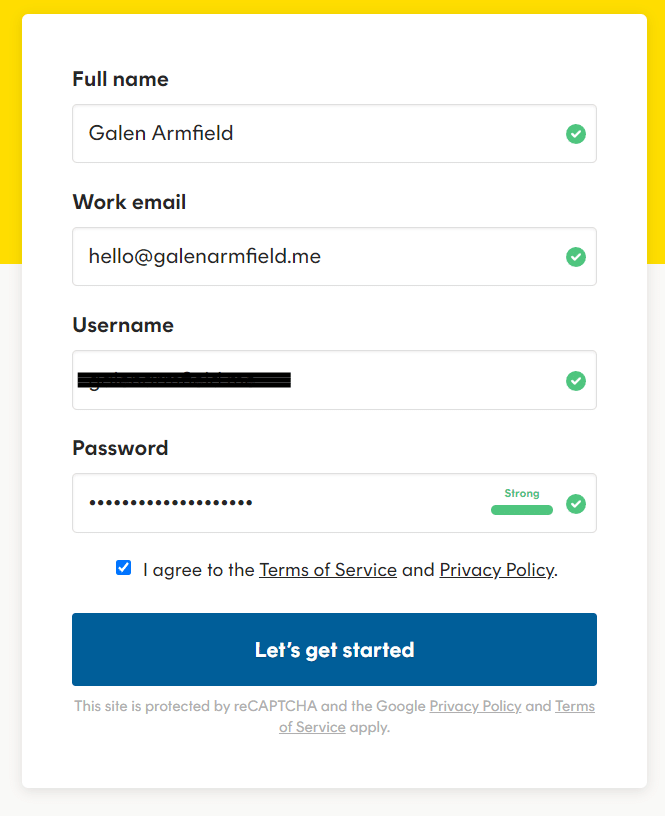
Enter site details and setup WordPress login credentials
The next stage will ask you to enter a few details about your site. These settings can be changed later in /wp-admin, but it’s helpful to ensure your username, email and password are entered incorrectly and you have a strong and secure password.
You can use your email to reset your password in the future along with adding further security measures using plugins like iThemes (which we will install later in this article).
Login to wp-admin with login credentials created earlier
After entering in your details and clicking the ‘Install WordPress’ button, you will need to log in to your WordPress site using the username/email and password you set.
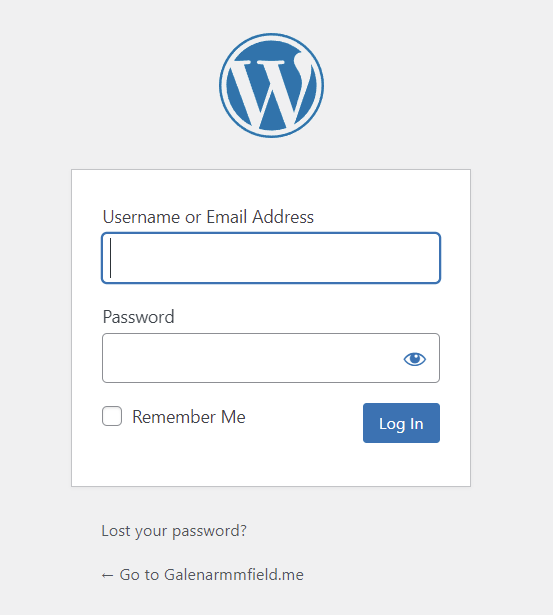
I suggest you save the username and password with your browser or a secure password manager like LastPass. We don’t have any specific recommendations as we have not conducted a case study to date.
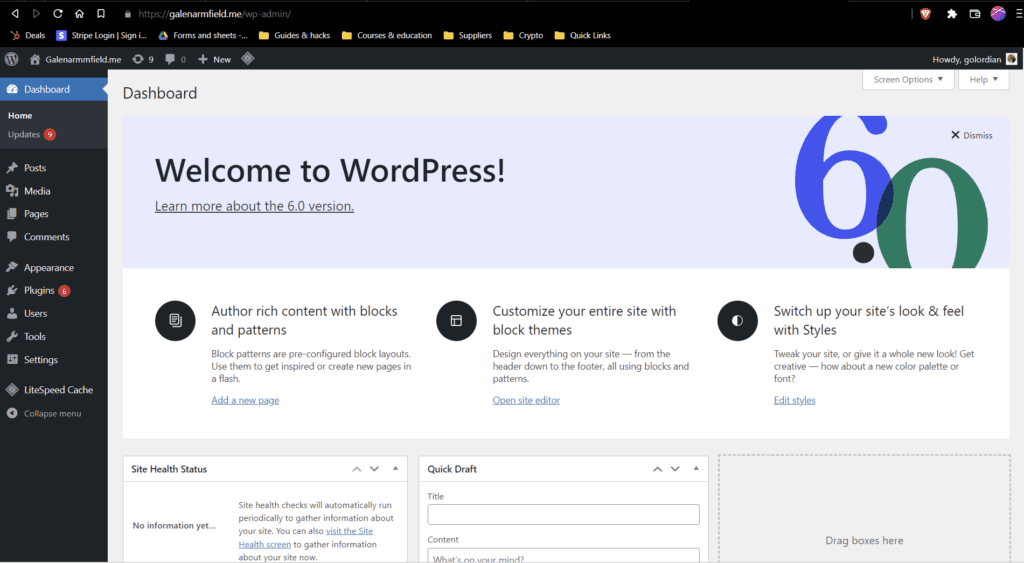
WordPress Admin Dashboard /wp-admin
Congratulations! You have now not only configured your DNS, but also installed an SSL certificate, Installed a VPS Server running Ubuntu and installed a powerful Free and Open source Content Management System. I think you deserve a pat on the back.
We are on the home stretch now, our final steps will take us through configuring and setting up WordPress, removing plugins & themes we don’t need and installing all the good stuff. All the links you will need will be included when we need them.
It is important for us to be selective about the plugins, themes, scripts and code we add to WordPress. Leaving unused plugins and themes on your site can leave you open to any vulnerabilities that you will probably not be aware of as you don’t use the plugin.
Keeping your site and its installed plugins and themes updated is another highly important habit you need to develop. Working with Child Themes is also highly recommended and/or regular backups with AIO WP Migration. You can set plugins to auto-update but we suggest logging into your /wp-admin on a regular basis.
For example, we conduct monthly backups and site reviews for all of our member subscribers, this is done manually by our technicians so we can ensure your site has been reviewed by an experienced human eye.
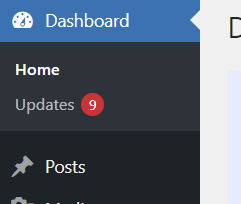
How to update all plugins on the WordPress Updates page
Checking for updates is as simple as logging into the /wp-admin and accessing your WordPress Dashboard (seen above). Under ‘Home’ you will see ‘Updates’ click on this link.
Once in the Updates section, you will see all of your plugins that have available updates from the developer. No need to waste time here, simple click select all using the table and click the ‘Update Plugins’ button. This will run the scripts to update all of your WordPress plugins and update the database accordingly.
**Important: Do not close or refresh the tab until the updates are finished, this can cause issues. **
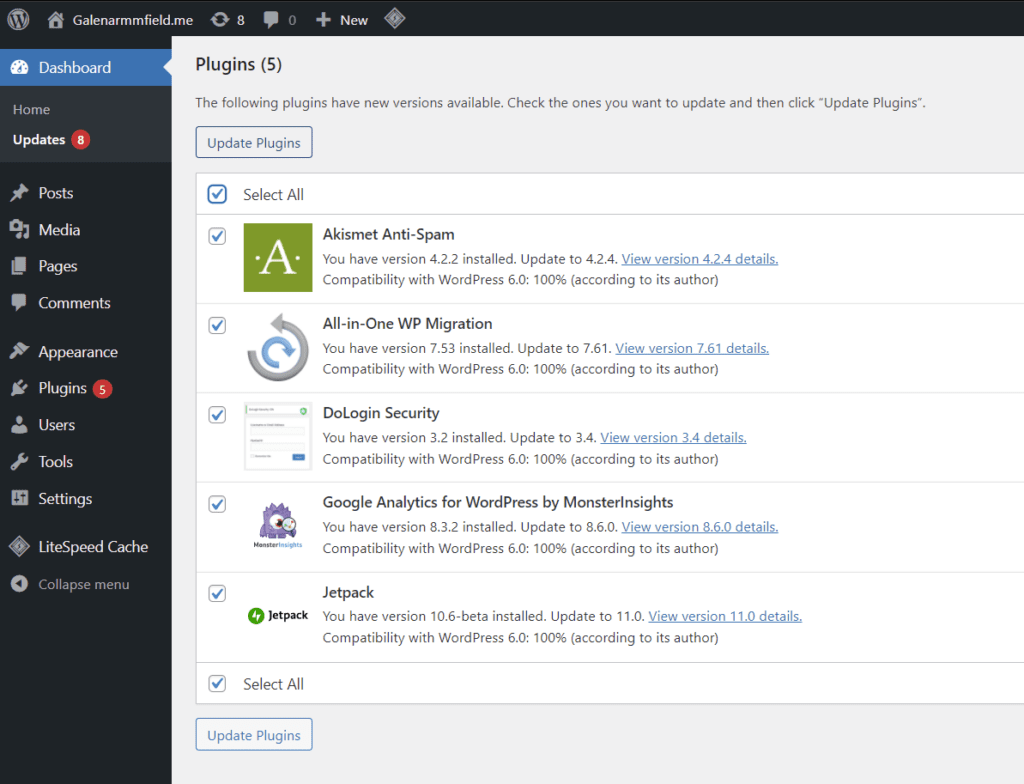
Once the updates have been completed click on the ‘Go to WordPress Updates page’ on the bottom right of the updates progress page.
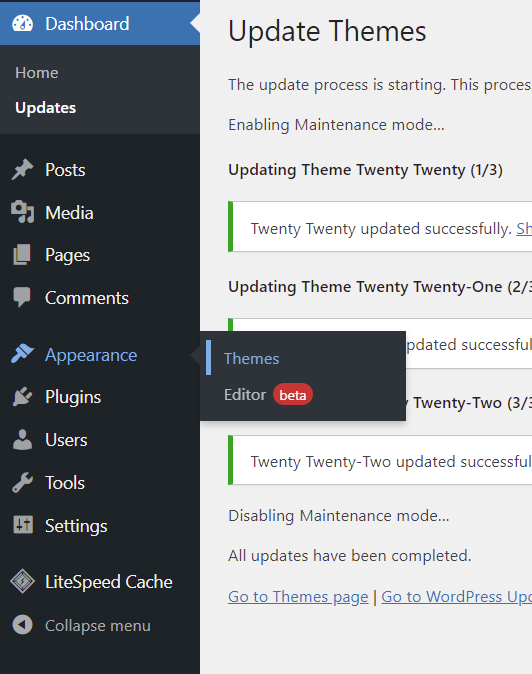
How to update all Themes on the WordPress Updates page
Now you will be back on the WordPress Updates page and will need to scroll down to the bottom of the page to select all themes and then click the update button.
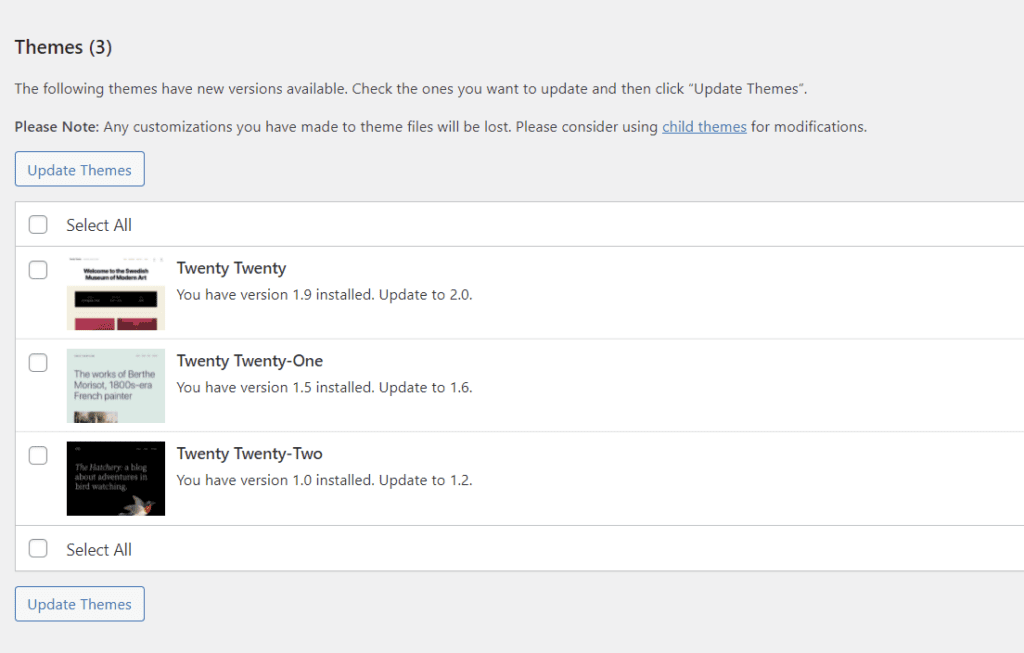
Just like the Plugins, the themes will update automatically and make sure you do not refresh or close the tab.
How to remove unwanted themes from WordPress
Not only will this save storage on your droplet. It also prevents your site from being exposed to vulnerabilities in inactive themes. We suggest you keep one theme in WordPress and ensure it is up to date at all times. To delete a theme in WordPress you need to click on Appearance > Themes.
Once on the WordPress themes page, Click on an inactive them and click the ‘Delete’ Button.
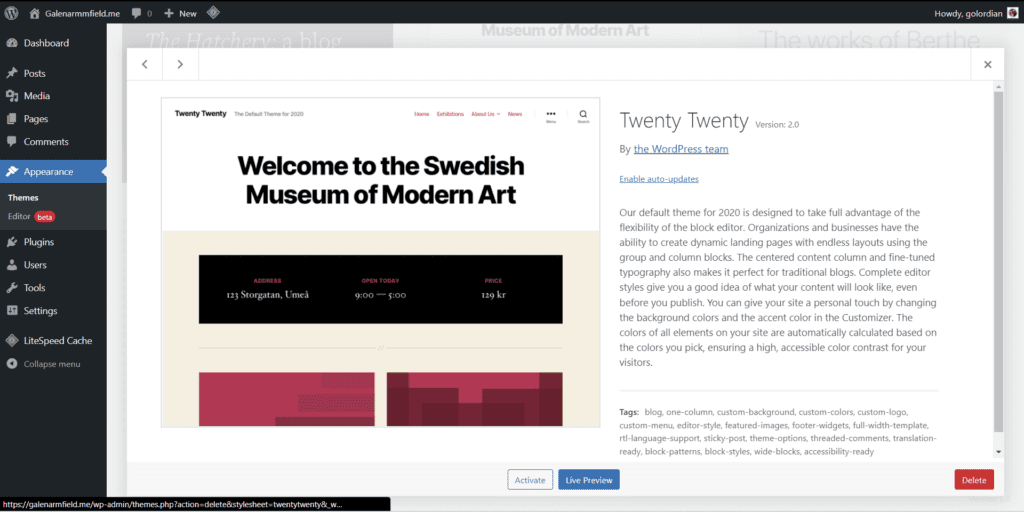
You will need to also click on the browser popup. If you do not get one you might need to check your browser’s pop-up settings for this site.
Usually, there are only 3 themes with a new WordPress installation, again we only need one. We will also be replacing the default theme with the Elegant Themes Divi Builder Theme. We absolutely love their builder, templates and all the add-ons you can get. There seems to be no limit to their NO CODE options, which we support.
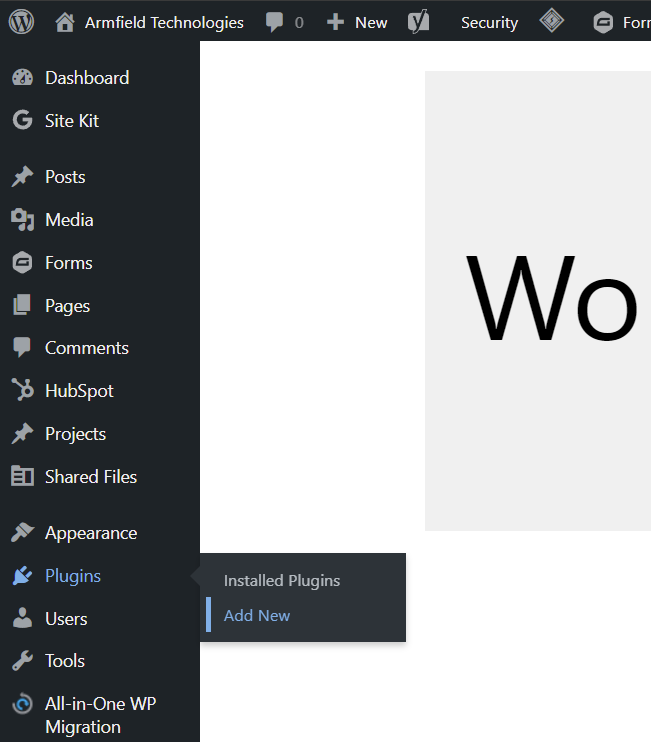
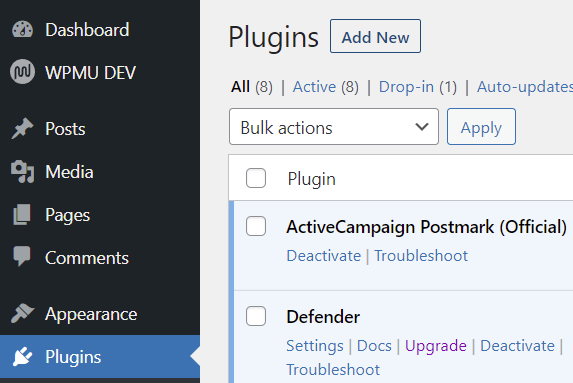
How to remove unwanted plugins from WordPress
Our theme is sorted and we have removed the waste there, let’s move on to the plugins. Let’s go to the plugins page and have a fresh start. Click on the ‘Plugins’ link.
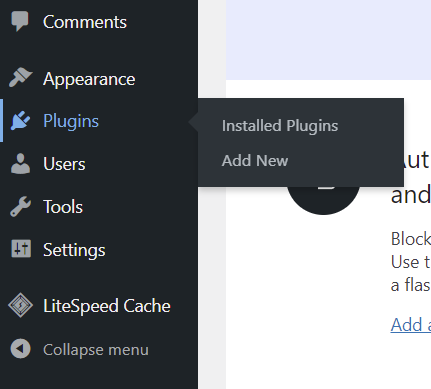
We will be taken to the Ínstalled Plugins page. Here we can add new plugins, and remove or update existing plugins. Plugins can be added to WordPress from the WordPress marketplace, many free plugins and many paid plugins. You can also upload and install custom plugins or the plugin files directly from the developer.
Now we want to remove all the plugins except for All-in-One WP Migration & LiteSpeed Cache. All-in-One WP Migration is a great free plugin that allows you to take a snapshot of your WordPress site within a few minutes, save it in the directory on the server and download a .zip to your own drive.
We do this will all our member sites, this was we have a fresh backup to use on the server and a long history of backups saved on a physical drive disconnected from the internet when not being updated.
Select all plugins except for All-in-One WP Migration & LiteSpeed Cache and click the ‘Bulk Actions’ selector and select ‘Delete’, finally we click on the ‘Apply Button’ to delete the selected plugins.
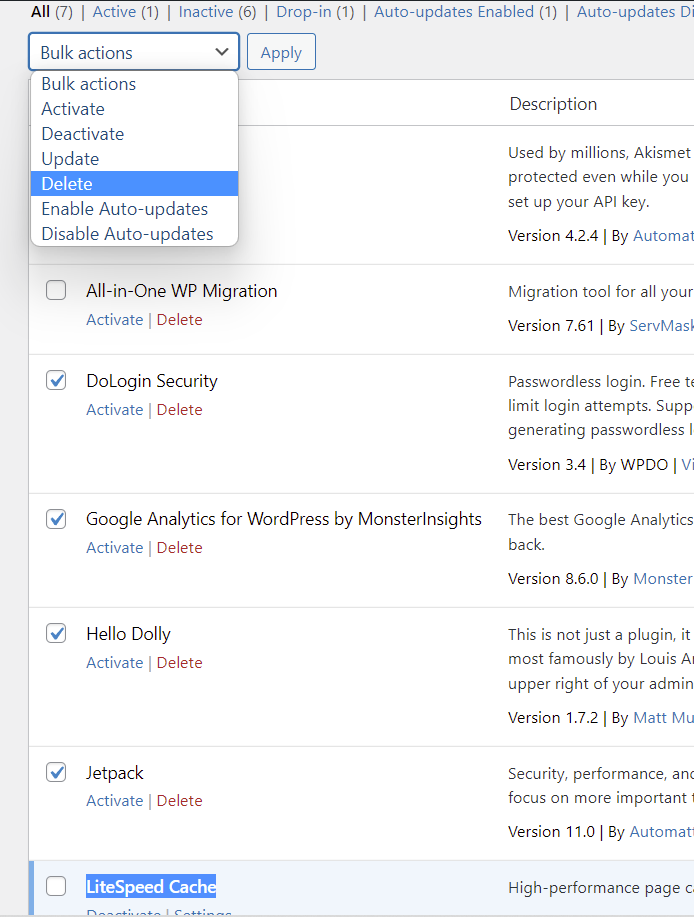
You will also need to click the browser popup and select OKAY.
Once we install a plugin, the plugin won’t be active on the site until we click ‘Activate’. Make sure you activate All-in-One WP Migration.

Review and Update WordPress Settings
Now we want to have a look at our settings page. If you are new, please familiarise yourself and have a look at the different preferences. Make sure your email is correct and change any permalink settings. This allows users to register or make comments on your content. You can change these settings to your preference.
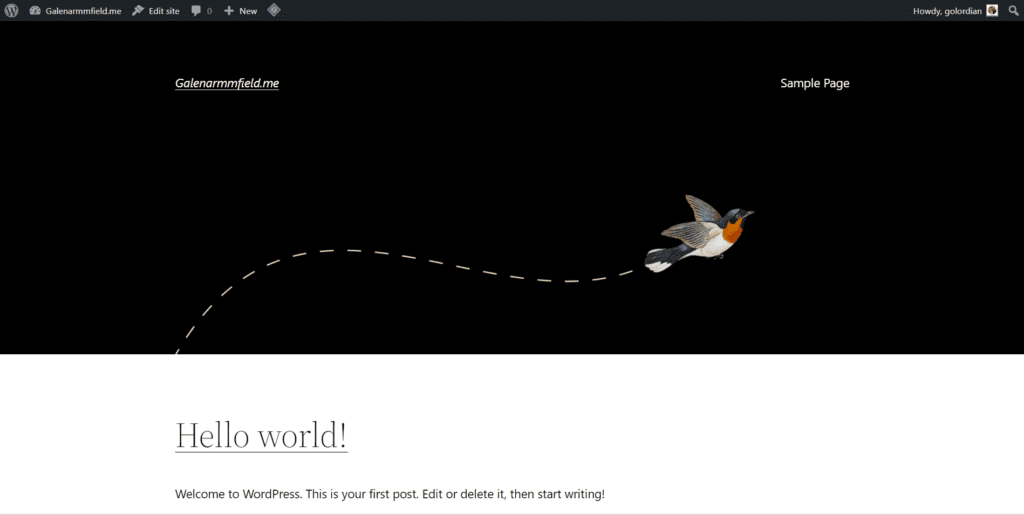
View your site in its current state (live)
To see what your site looks like when you visit the domain (URL https://www.domain.com). Go to the top left corner of the WordPress Dashboard and click on your site’s title.
As you will be able to see, WordPress already has quite a nice and stylish theme built-in. The default WP theme is a deal for getting started with blogs and getting straight into content creation. Many e-Commerce plugins you can get will have their own styled pages or templates.
WordPress has also released a beta page builder in the latest update. Otherwise, you can subscribe to one of our memberships for the Divi theme and page builder.
The ‘Homepage’ default template will include a header with your menu, and a section to include your blog posts. Menus can be populated with links, posts, pages or even anchor links to areas of a specific page. You can learn more about WP Anchor links: https://wordpress.org/support/article/page-jumps/. We will go into detail about anchor links later on in this article.
Install & configure Free WordPress plugins
The WordPress plugins we will install today include:
- Health Check & Troubleshooting (Check up on your site and get tips for resolving common issues)
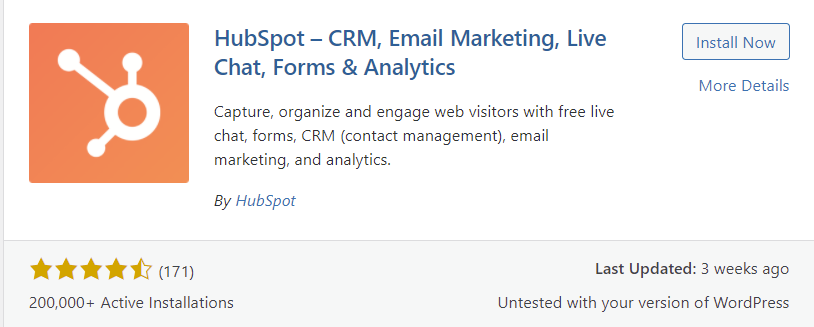
- HubSpot All-In-One Marketing – Forms, Popups, Live Chat (Free CRM and Live chat)
- iThemes Security (Free security plugin for WordPress with 2FA login authentication)
- Shared Files (upload your own files to a public location and share links, set your own upload limits, password protect your page, take control of your data and save on link file sharing apps)
- Simple Google reCAPTCHA (Add site-wide Google V2 or V3 Recaptcha to your site, protect your site from bots & spam)
- Site Kit by Google (Easily connect your site to your google management accounts like google analytics, google ads, automatically upload XML site maps to google crawler and also get page speed insights from google)
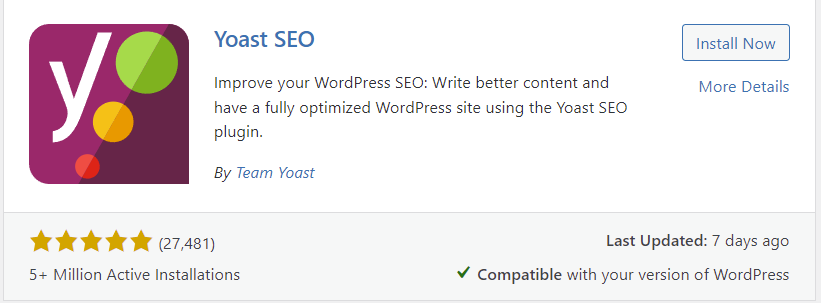
- Yoast SEO (The first true all-in-one SEO solution for WordPress, including on-page content analysis, bulk focus keyphrase editor, meta description editor and focus keyphrase editor along with many other free and paid features)
- ActiveCampaign Postmark (Official) (This will overwrite the WP_mail and sends emails through their mail servers free 100 emails per month)
Once I show you how to install one plugin. I have faith that you will be able to install the rest. Teach a person to fish kinda thing. Some of the plugins will require some set up which I will walk you through below. Plugins like Health Check & Troubleshooting don’t need any configuration, their features are available on activation.
How to install a plugin on your WordPress site
First, you go to your WordPress Dashboard (/wp-admin) > and click plugins > Add new plugin.
Then we search for our first plugin ‘Health Check & Troubleshooting‘ and click ‘Install’ on the plugin once the search completes.
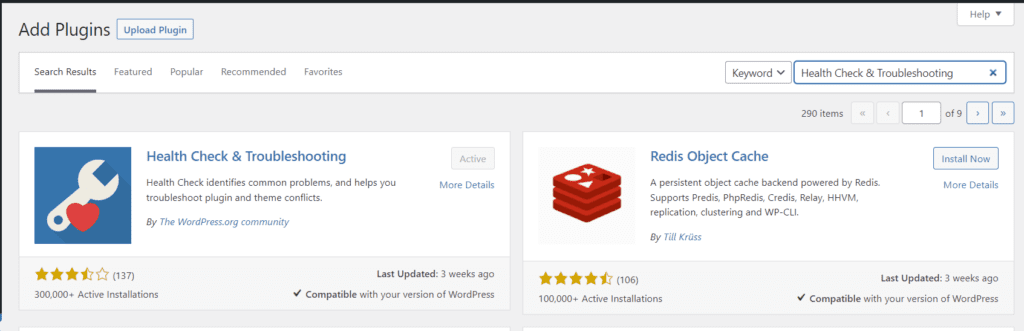
Once installed click ‘Activate’ at the bottom of the install progress page.
That’s it! Most plugins are just that easy. Some will have automated set-up walkthroughs. Some require a few additional steps but they will show you most of the time. If you get stuck feel free to message us using the chat bubble at the bottom right of your screen.
Please go ahead and install all the plugins on the list. We won’t be walking you through the account set-up or automated setup. I have faith you have the ability now, all you will need to do is read the instructions. Save us copying and pasting information that may change in the future.
How to set up ActiveCampaign Postmark (Official)
Before we make the same mistake we made when writing this article. By setting up 2FA before we have a working reliable SMTP server. So, let’s get this mail plugin installed we don’t need to remove plugins with FileZilla again.
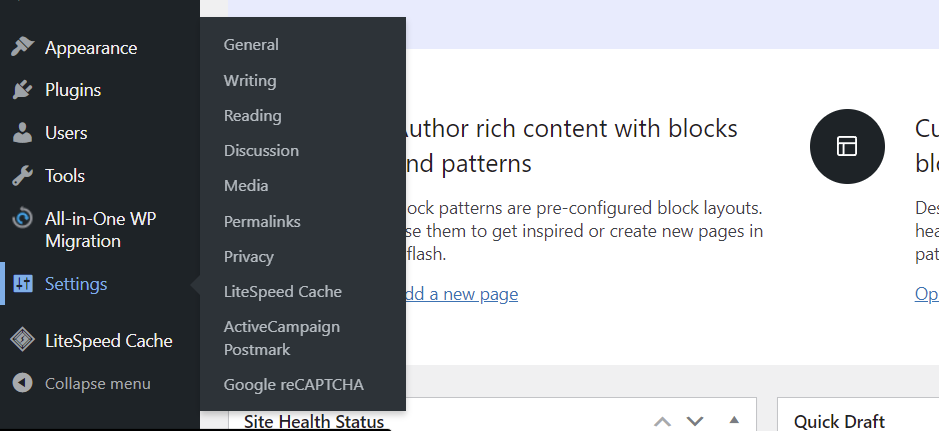
First, go to ‘Settings’ and then ‘ActiveCampaignPostmark’.
In the ActiveCampaign Postmark plugin, we can update our mail settings. We can also view logs and send test emails from this page. But, before we update any settings, we need to create a Free PostMarkApp account.
I suggest you ping the PostMarkApp support team after you sign up and ask for the “Friends & Family Discount”. Mention our email ‘[email protected]’ and they will do the rest. 😉
As we set up the email forwarder in Cloudflare, we can already receive emails using our custom email address. Okay, let’s verify our domain with PostmarkApp by going to ‘Sender Signatures’ and clicking ‘DNS Settings.

PostmarkApp will give you the task of creating two new DNS records in Cloudflare to verify our domain. So let’s copy the hostname and the values.
Head over to Cloudflare > DNS and click ‘Add record’. Now paste the values in their respective fields. Be sure to select the correct record type. One record will be a ‘TXT’ and one will be a ‘CNAME’. It may take a few minutes or hours for the DNS records to populate. Have a coffee.

Once you have created the two records, head back to PostmarkApp and click ‘Verify’ for each record.
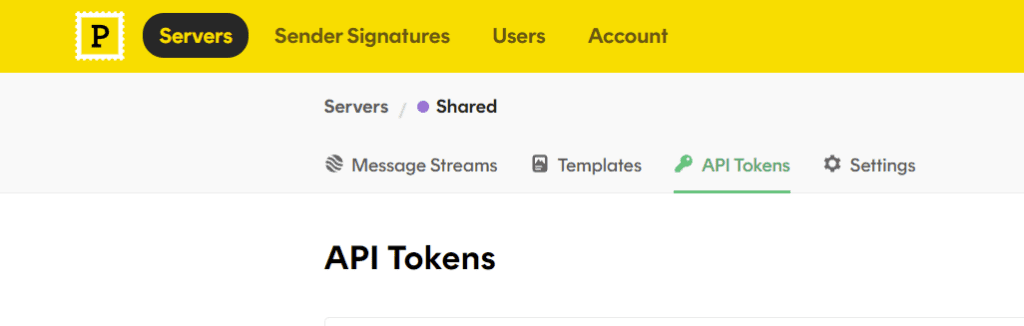
To get your API token, go to ‘Servers’. Then Select ‘API tokens’ and copy the Server API token.
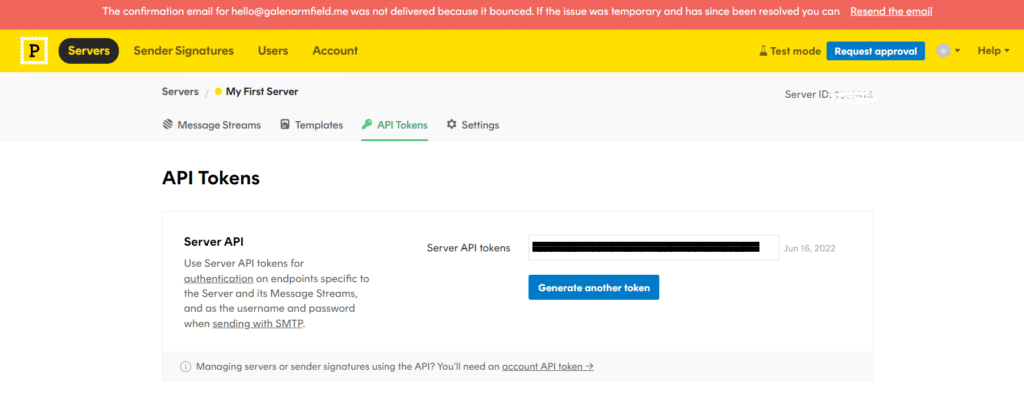
Head back to the ActiveCampaign Postmark Plugin and paste the API token.
How to setUp Sender Signature in PostMarkApp
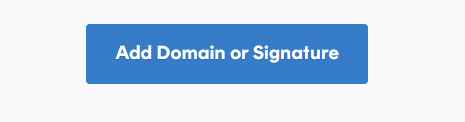
Go to the ‘Sender Signature’ tab.

Click add ‘Domain or Signature’.
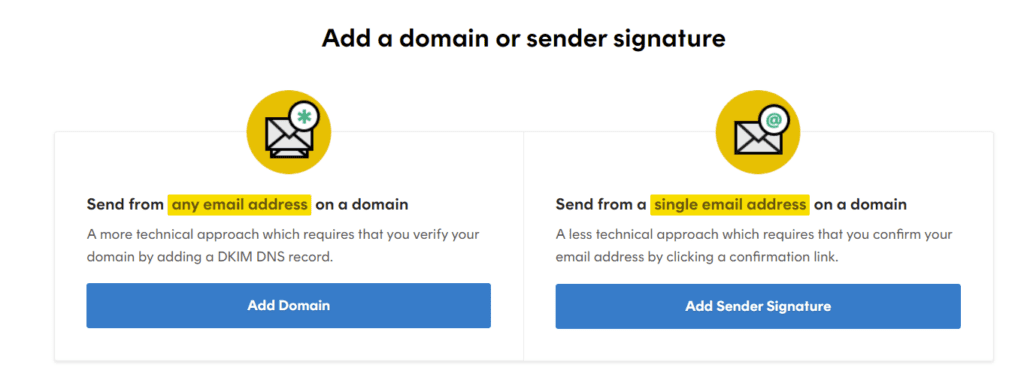
Select send from ‘Add Domain’.
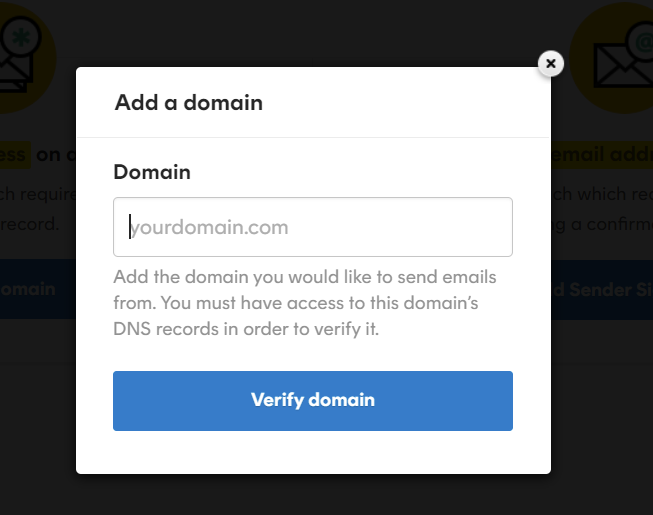
Enter your domain and click ‘Verify domain’.
Now as Cloudflare is managing our DNS, go to cloudflare.com and log into your account.
Select your website and then click ‘DNS’.
Click ‘Add record’

Add the TXT and CNAME records PostMarkApp gives you to cloudflare.com
Back to PostMarkApp to verify the records.
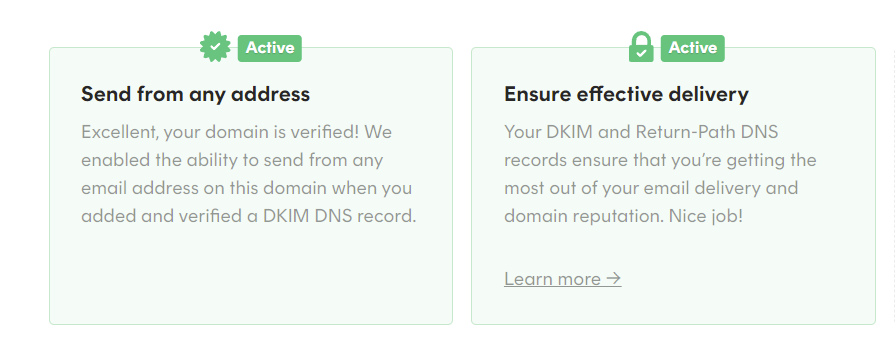
It may take 24-48 hours for the DNS records to be loaded and verified. PostMarkApp will send you an email once the records have been verified.
Now that we have the DNS records added and verified, we can add the PostMarkApp API token and connect our WordPress site with our PostMarkApp mail server.
To get your PostMarkApp API token, go to ‘Servers’ and click on your server. Then click ‘API tokens’, and copy the Server API token.
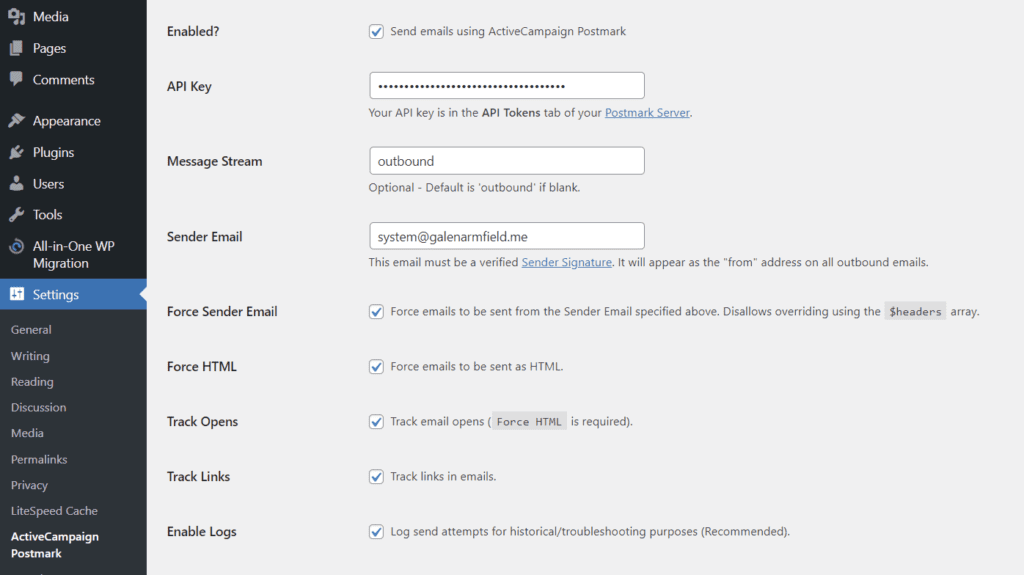
Open PostMarkApp settings in WordPress > Settings > ActiveCampaign(PostMark) > Paste Server API token > and check the settings you’d prefer. The ‘Sender email’ in the ‘Sender Signature’ you setup in PostMarkApp > Sender Signatures > ‘Add Signature’.
To test our work, click on the ‘Send Test Email’ and send an email to your Gmail or Hotmail address.
Now WordPress system emails can be sent through PostMarkApp.
How to set up iThemes on your WordPress site
iThemes is the first and most important plugin for us to configure, I know this from experience (The first time I got to the first page of Google, hacked and my backups failed to restore).
Go to WordPress Plugins > find iThemes and make sure it is active > click the iThemes ‘Settings’ link and this will start the iThemes set-up guide. Follow the instructions and use the video for a guide if you need it.
How to set up iThemes Two Factor Authentication (2FA) for login on your WordPress site
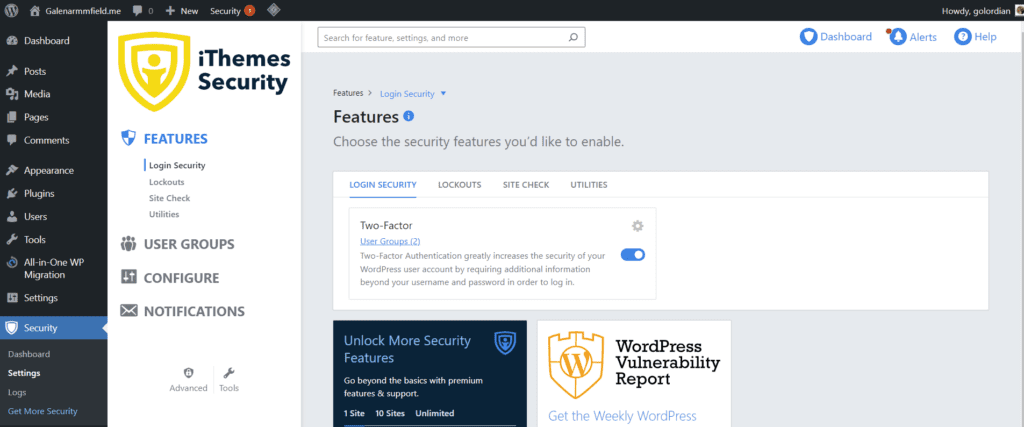
To set-up Two Factor Authentication on /wp-admin login go to /wp-admin > iThemes > Features > Login Security and enable Two-Factor.
Now go to Users > Profile and scroll down to see the 2FA settings for your user.
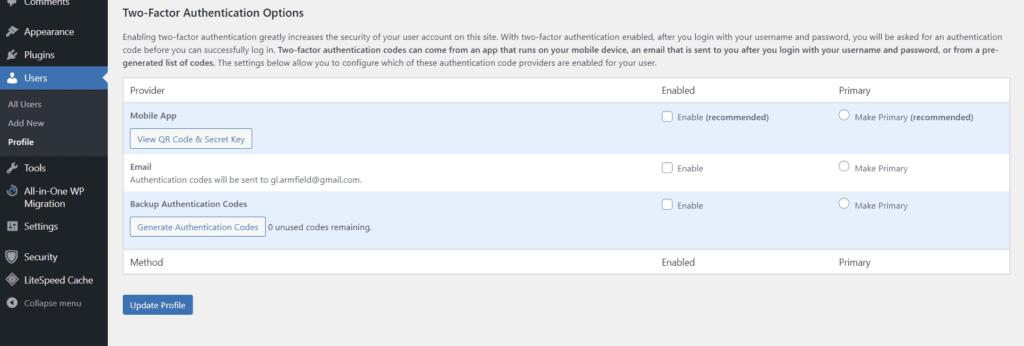
You can choose from a Mobile App like Google Authenticator, Email and/or Backup Authentication Codes, then select the primary method you wish to use. We don’t have a preference on which option.
Once you have updated your 2FA settings for your user, click ‘Update Profile’ to save your changes.
How to regain access to /wp-admin if iThemes 2FA is not working (FTP)
How to set up Simple Google Recaptcha on your WordPress Site
To set up the Simple Google Recaptcha plugin on your WordPress site, first, go to ‘Settings’ > ‘Google Recaptcha’.
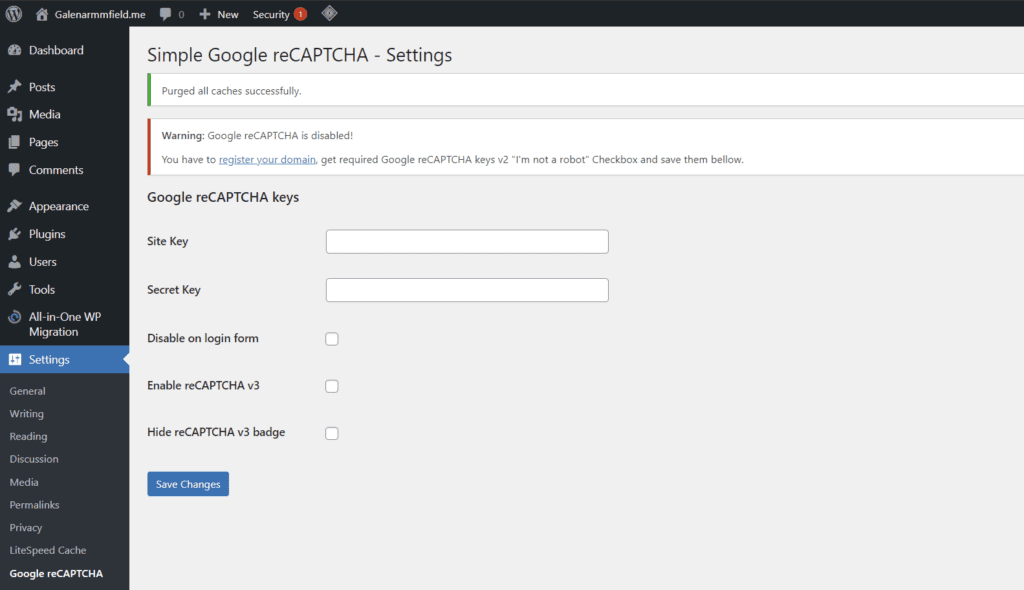
As you can see, this plugin is quite… ‘simple’. All we need to do is create some keys in the google reCaptcha admin page here: https://www.google.com/recaptcha/admin/ and login to our google account.
Click the ‘+’ button to create a new site > enter the site label (your domain) > select your reCAPTCHA type (V3 score) > add the domains you will be using (your domain) > accept the ‘Accept the reCAPTCHA Terms of Service’ > make sure your google account is listed as an ‘Owner’ and click ‘Submit’.
For this example, we are going to implement a site-wide
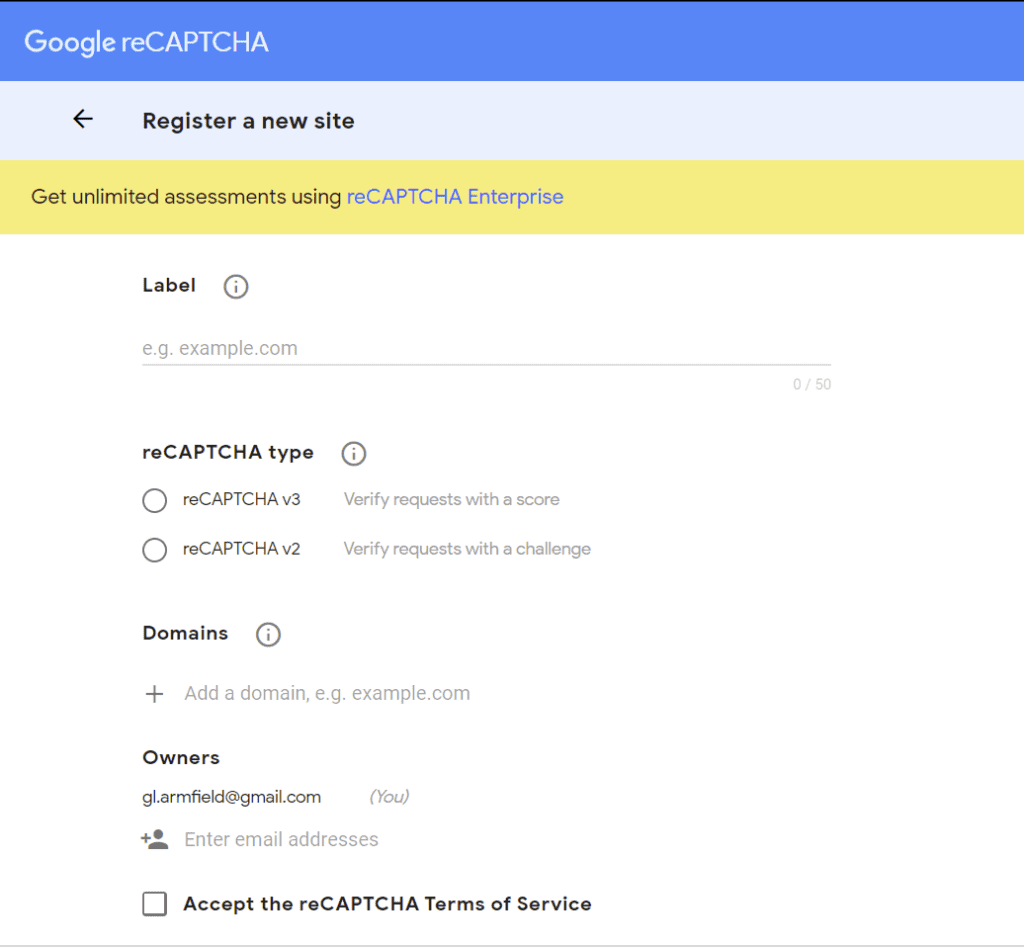
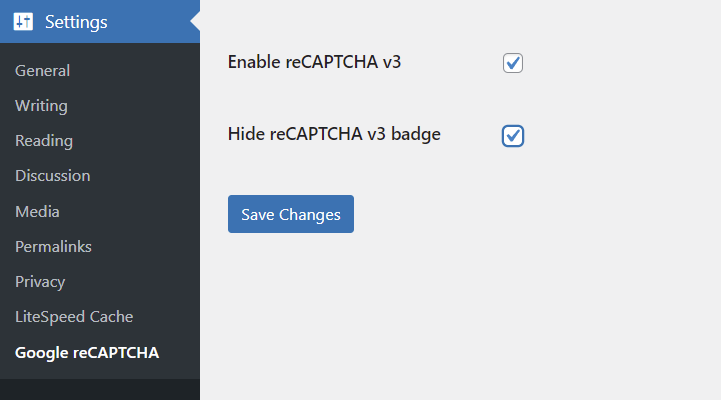
The next page after you click ‘Submit’ will show you your site key and secret key. Copy the relevant keys into their fields from Google reCAPTCHA admin to Simple Google reCAPTCHA on your WordPress site. As we have set up V3 keys we will need to enable V3. I prefer to hide the badge as it can get annoying when scrolling.
If you ever need to you can return to this section if ReCaptcha is causing issues. I have found that reCAPTCHA on login was preventing me from integrating some of our payment software. So I temporarily disabled reCAPTCHA on login.
Don’t forget to ‘Save Changes’ once you have enabled reCAPTCHA v3 and copied over your site key & secret key.
So now we have a self-managed WordPress site with the default theme. WordPress is now secure and /wp-admin is protected with a strong password and 2FA. We have site-wide Google reCAPTCHA which will help prevent bots and spam. And, we have a Content Delivery Network and DDoS mitigation from Cloudflare! Now all network traffic with our domain has advanced protection.
I think we have invested enough time and reached a good milestone for a backup. So let’s show you how to do that.
How to backup your WordPress site with the All-in-One WP Migration plugin
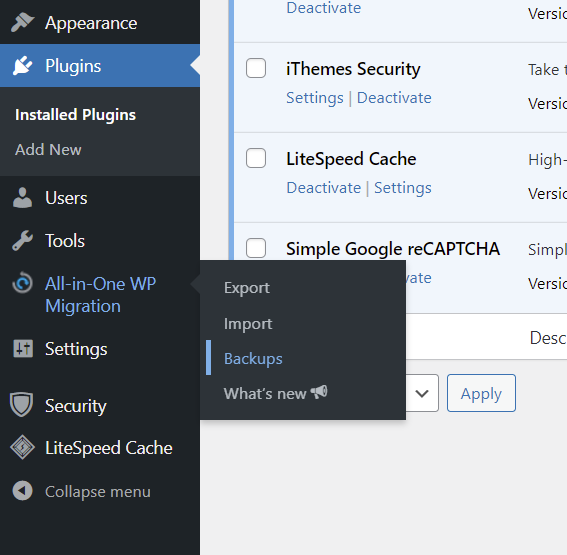
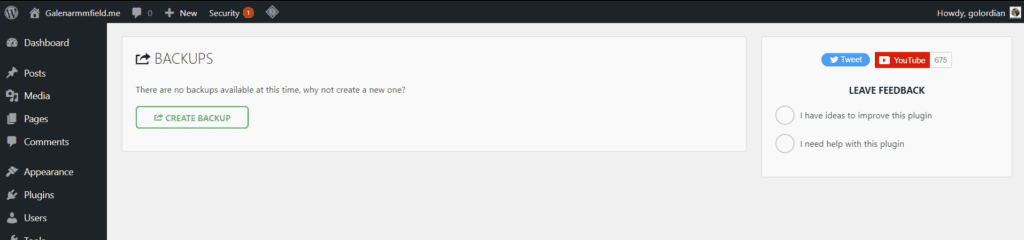
To backup, your WordPress site with the All-in-One WP Migration plugin. Go to ‘All-in-One wp Migration’ and click ‘Backups’.
Then we simply click on ‘Create Backup’ and the plugin gets to work.
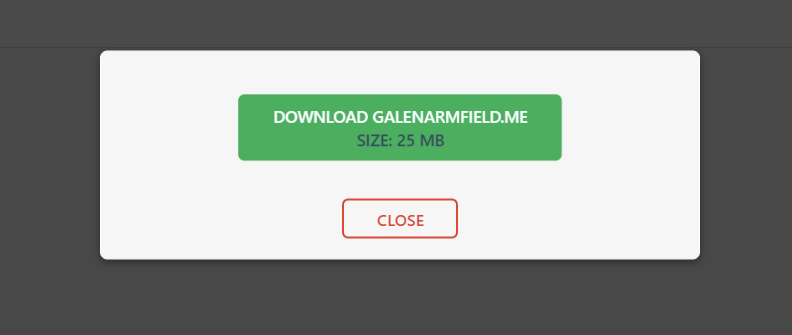
All-in-One WP Migration will create a complete backup, and save it to your WP directory. You can also download the .zip file to your device. It’s a good idea to download a backup of your site to your device or upload it to cloud storage.
We prefer to keep one backup on the WP directory at all times. It is usually the most recent, and this allows ease of access to the backup. It’s important to note that there will be limitations to restoring your backup if your file size exceeds 64MB.
You can change this with some code but we prefered a paid plugin from the developers. Included in all ArmfieldTech memberships.
Congratulations, you have backed up your WordPress site.
How to set up Site Kit by Google plugin
The Google Site Kit plugin is a great tool for your WordPress site. This plugin by Google Inc. combines, analytics, ads, site maps and page speed insights all into one plugin. You can also follow this more detailed article here.
To set up the Google Site Kit, go to WP-Admin > Plugins > ‘Add New’.
Now go to the top right and type ‘Google Site Kit’ into the search > Install & Activate the plugin.
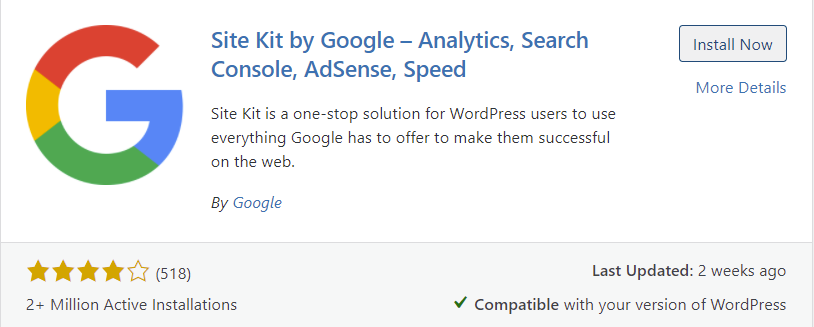
Click ‘START SETUP’ once the Google Kit Kit plugin has been activated.

Follow the setup instructions to sign in, grant access and connect your Google account. I won’t go through each step as Google will change the process and it is usually quite user-friendly.
After the initial setup, when asked to set up analytics properties; I suggest you create a new property and keep the default options for now. We will go into Google Analytics properties and more in future articles.
Google will start indexing your site and you’ll start to see more data in the weeks to come.
How to install and set up the Divi Theme & import a template for your WP homepage
Go to WP-Admin > Appearance > Themes > Add new > Upload theme > Upload Divi.zip > Activate Divi theme.
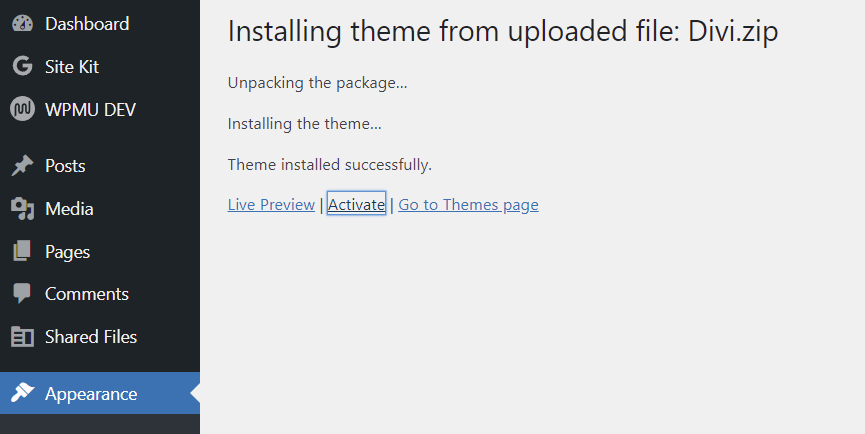
The Divi theme requires a license key to function correctly and get updates. Without the key, it’s pointless using the theme. To get a key, visit elegantthemes.com. If you are an ArmfieldTech member, you will already have a Divi license key.
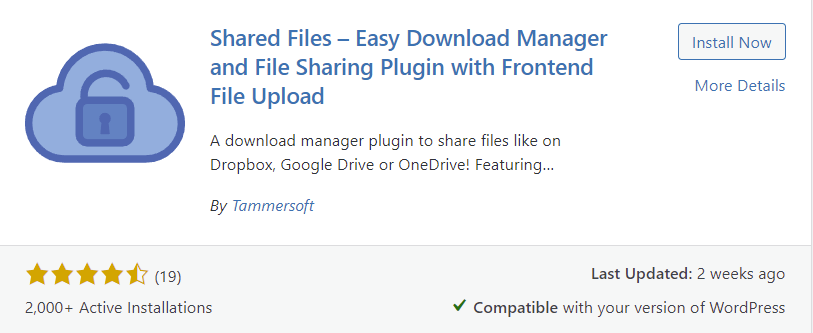
How to set up File Sharing on your WordPress site
Have you ever wanted to send a file link to someone? Do you need to host an image for your email signature? Or many you just want to make some files publicly available. Well, in this section I will walk you through How to set up File Sharing on your WordPress site.
First, go to your WP-Admin > Plugins > Add new.

Search for ‘Shared files’ > Install & Activate ‘Shared files’ plugin (as seen below).
You can skip the freemius.com diagnostic data sharing ad.

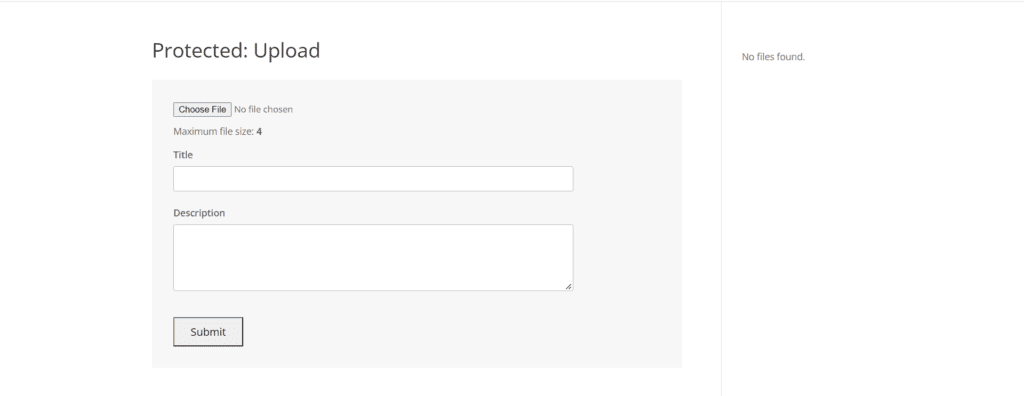
First, let’s set the file upload limit. Scroll down the Shared Files page until you see the Upload Limit field.

Now my personal preference is 4MB, but you can set it to whatever you like.
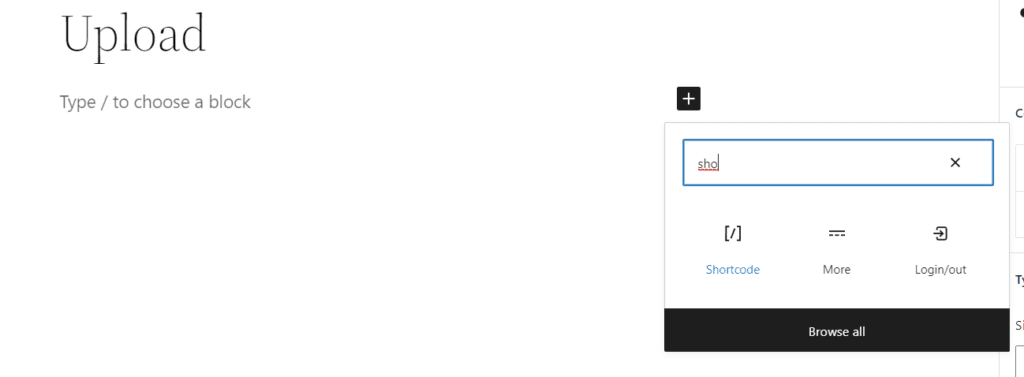
You might have noticed the [shortcodes] at the top of the page, we are going to add these to a page.
To add a page, go to Pages > Add new
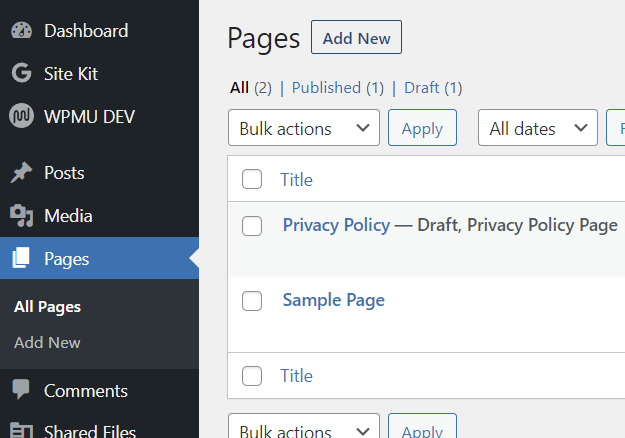
This will create a blank page, add your title and click ‘Publish’. We will be using the default editor for this page, not DIVI. A second panel will open with more options, click ‘Visibility’ and set a password to protect the page. While setting a password is optional, I recommend it unless you want public uploads.
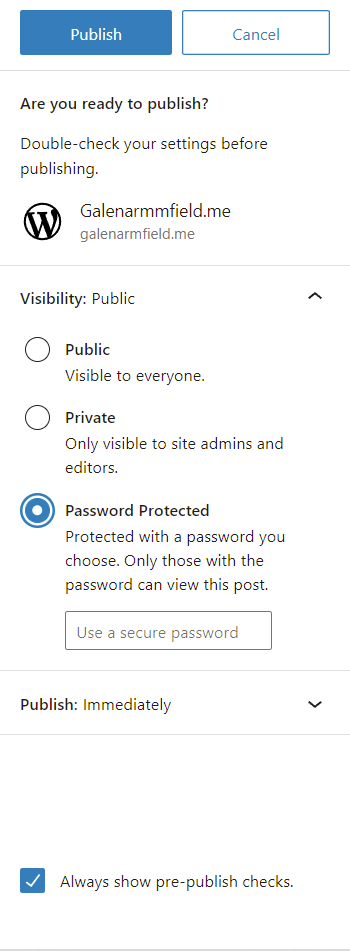
Click ‘Publish’ at the top once you have set your visibility preferences.
To get [shortcodes] go to Shared Files > ShortCodes. For this example, we will be using


